Posts mit dem Label essence werden angezeigt. Alle Posts anzeigen

Freitag, 19. Dezember 2014

Foiled... again

...and so much better too!

My colleague gave the Ciaté Foils set to me, because she felt like she doesn't have the patience for this kind of nail art. This is my first try with the set and I really like it. Next time, I want to try the glue with the foil I got from Bornprettystore. I haven't gotten that to work yet, but I suspect it's due to the glue. So maybe I get better results with the Ciaté glue.

Aside from playing with foils once more, I also tried practising the one stroke technique again. I'm still not all that happy with my acrylic paints. Either this or I'm doing something fundamentally wrong. :P


"And here's another manicure for the Nail Challenge Collaborative's month of July. I had pondered which manicure I should recreate and I decided on an old one where I first used foils. It's not even close to the one though. ;) The polish is the same: essence - Grand-Plié in Black. The rest is foils and acrylic paints."

The original manicure can be found -->here<--

The essence polish had almost gone bad, by the way. Even though I hadn't used the polish since that post from 2011 and the bottle neck was clean, I had to add a lot of thinner to be able to use it again. Good thing that thinner exists! :)

Donnerstag, 18. Dezember 2014

Practising the art of water marbling...

...and actually getting a little better at it!

I remember that I chose the manicures I wanted to recreate for the Nail Challenge Collaborative under the aspect of "trying again". This is another one that might not look like a total failure, but it basically is. The first one was painted, because I couldn't get the marbling right, but I liked the color combination so much, that I did it the simple way. But this time I managed to do a pretty decent water marble. Yay!


"And the third manicure for the Nail Challenge Collaborative's month of July. Another recreation. In this case a failed #watermarbling that worked out so much better this time. But it's never going to be a go-to nail art technique for me. Polishes were the same as in 2011! Essence - Replay, Manhattan - 51K, p2 - virgin."

The original manicure can be found -->here<--


I still like the original manicure. :) But... I had nubbins! That's like half of my current (December) nail length!


Montag, 27. Januar 2014

TNCC - Inspired by Art - #3

Hi everyone,

so exactly one month ago my last post went online and I really thought I would be back to a more regular posting routine... but far from it! The same day we got bad news concerning my father's health and my thoughts obviously weren't centered around nail polish for a while. The week after, I got into an accident and was hurting badly for a while afterwards. Nothing serious happened, but with constant headache, I didn't feel like adding polish fumes to it. So I resorted to buying lots of polish instead. My pile of untrieds isn't high enough yet! ^^;

To find a way back into a more regular schedule, I'm going to start with the third installment of my art inspired manicures. Inspired by Art was the monthly theme of December for the Nail Challenge Collaborative in case you don't know/forgot.

Inspiration for this manicure is the painting "Hygeia" by Gustav Klimt.


Materials used:
- essence Tip Painter in Natural White (poured into a normal polish bottle)
- yellow and red acrylic paint

I tried my new acrylic paints for this mani, but I'm a bit disappointed in them. I bought them because they're supposed to be really opaque, but even without diluting them they're hardly as opaque as the ones I used before.

Thanks for reading!

Donnerstag, 26. Dezember 2013

TNCC - Inspired by Art - #2

Hi everyone! 

Today, I want to show you the second art inspired manicure I did for the Nail Challenge Collaborative. 

Heute habe ich meine zweite kunstinspirierte Mani für euch! Meine Inspiration habe ich wieder auf Pinterest gefunden. Das Bild heißt "Before Morning" und wurde von Leonid Afremov gemalt. Die leuchtenden Farben auf dem dunklen Hintergrund gefallen mir wirklich sehr gut. Außerdem dachte ich, dass die verwendete Technik sich auf den Nägeln leicht nachmachen lässt. (Naja...)

I have also found my inspiration on pinterest for this one. The original work is "Before Morning" by Leonid Afremov. I love the bright colors on the dark background. Also, I thought that the way it has been painted should make it rather easy to recreate. ^^;


The accent nail was painted using acrylic paints on top of black polish. It's just easier for the details. The rest of the nails were painted with polish only.

Alles bis auf den Akzentnagel ist vollständig mit Nagellack gemalt, während der Akzentnagel fast gänzlich mit Acrylfarbe gemalt wurde. Ist einfach einfacher für die Details und leichte Farbabstufungen.

Products used:
- p2 eternal (black base)
- OPI Jade is the new Black
- Nicole by OPI Daffy Dill
- Kiko 356, 386, 389
- Catrice Nautica
- essence berry me home
- beauty uk nameless yellow polish
- acrylic paint

In general, I think this turned out ok. Sadly, the colors don't pop as much as I had hoped. I didn't want to layer too much, because I think that would have destroyed the effect somewhat. Some of the colors were actually more opaque before topcoat. The yellow for example. 

Mein Ergebnis finde ich soweit ok. Leider sind die Farben nicht so schön bunt wie beim Original. Ich hatte die Befürchtung, dass Schichten dem Ganzen abträglich wäre und habe deswegen jeweils nur eine Schicht draufgekleckst. Seltsamerweise waren auch alle Lackfarben vor dem Topcoat deutlich leuchtender als danach. Ganz stark z.B. beim Gelb.

What do you think?
Was meint ihr?


Sonntag, 15. Dezember 2013

TNCC - Favorite Color - #4

Hi,

since I finally finished my first manicure for the December theme, I feel like I have to rush this post a little bit... This is my final manicure for the Favorite Color month of the Nail Challenge Collaborative.

I tried making stamping decals for the first time. I ordered my first MoYou plates a little while ago and this one image on Suki plate #6 actually reminded me of a pattern I saw in Japan. I guess I shouldn't have tried doing full nail decals when trying for the first time, but I think the manicure turned out okay. Of course, there's a lot of room for improvement, but I think you'll see me try again with stamping decals. There are some nice combinations possible - especially with the MoYou plates I got....


Sorry for the crappy pictures. All of them were taken on day three, hence the damage at the tips.

Products used:
- essence gabriella (from the first range of nail art twins)
- essie good as gold
- Barielle Pin Up
- MoYou London - Suki plate #6

For the stamping process itself, I followed this tutorial - the first that pops up when you search for stamping decals on google. ^^;

What do you think? Have you tried making stamping decals and do you have any tips to share?
Thanks for reading!

Freitag, 6. Dezember 2013

TNCC - Favorite Color - #3

Hi everyone,

while I'm already researching the next theme of The Nail Challenge Collaborative ("Art"), I still have to show the final two manicures for the last theme. So here's the third.

This manicure was inspired by one I saw in a Japanese nail art magazine, I bought in Japan. It didn't work out exactly how I wanted it. I tried my new acrylic paint, but I feel like my hand is not steady anymore and/or my brushes suck. I already ordered a couple of new ones...


Materials used:
- essence Tip Painter in Natural White (I poured two of those into a normal, empty polish bottle)
- purple, red, pink and white acrylic paint
- white half pearls
- golden buillon beads

So, yeah, the only polishes involved here is the essence Tip Painter and the Top Coat. I really like the essence one. I was curious when they released the natural white variation, because I'm looking for my perfect off-white polish - not too beige, not too grey, not too pink. This one is pretty much the shade I have been looking for. I just wish it was a little more opaque. Those are three coats and it's still not entirely opaque.

I need to find buillon beads bigger than the ones I have. I should have bought that set I saw in Japan. I just thought it's so expensive...... Does anyone know if BPS or some other similar online store has "big" buillon beads? It's hard to tell from the pictures on the web.

Thanks for reading!
I hope you have a great day~


Sonntag, 17. November 2013

TNCC - Around the World #3 - China

Hello,

I hope everyone is having a great weekend so far! It's a short one for me, but I hope I'll get around to do some more nail art later!

As I wrote in my second-to-last post, I did most of the manicures for the Nail Challenge Collaborative. I'm going to post these from time to time with the according theme mentioned. So today, I want to show you the last manicure for the theme of August: Around the World. I didn't want to do a "Japan" manicure... I'm doing too many of those. So I decided on China. Close, but something else. Aside from asian food, architecture and silk, I associate pandas with China. A panda manicure it is!


Materials used:
- essence Black is back
- Kiko 626 Lawn Green
- black and white acrylic paint
- Stamping Plate


Donnerstag, 14. November 2013

TNCC - Favorite Color - #1

Hi everyone,

it has been ages... again. Partly, this was planned, partly... not. In September, I was on vacation and travelled a lot, so I was pretty sure beforehand that it would be a quiet month. But I had planned to still do all four manicures for that TNCC month afterwards.

Well, I had a great time in Japan and, maybe, I'll even write a post about it. But all of that has got a really bad aftertaste now, because I had to find out the night I returned, that three days after I left for Japan... my cat had disappeared and nobody told me. While I understand why my family decided to keep quiet about it, it made things difficult for me - emotionally. My pets are very important to me and when something happens to them, I get extremely emotional. And lagging two weeks behind everyone in that aspect was terrible. They had long accepted the fact that Mio had disappeared and were not really understanding/supporting in any way. They all appeared rather indifferent to me back then and I still can't understand how they could give up searching actively after a mere two weeks and bake elaborate cakes instead of putting up new posters.

I don't know if it would have been better if I had known while being in Japan. Maybe. What I know for sure is that it threw me out of my loop completely. I didn't really do my nails for a couple of weeks, didn't read any blogs, just worked and kept looking for my cat. He's still gone and there's little hope that he will return considering his character. He loved being with the family, so he wouldn't just disappear without any reason. It's too quiet in the house with him missing and even though it has been 10 weeks by now, I'm still not used to him not being here...

But I started doing my nails again. I feel really uncreative since then, but I can't stay in this slump forever. So starting this post, I'll try to not only do my nails, but post the pictures to my blog as well. The posts might be shorter on text for the time being though.

So to get back on track, I'm going to ignore the fact that I have been missing about 9 TNCC manicures until now and just start with the first one for the month of November. The theme is easy: favorite color. I decided on purple, because there were a couple of purple untrieds on my desk. So here you go, a Japanese nail art inspired manicure in purple!


I tried to paint one stroke flowers, but failed. I liked the one on my thumb though...

Materials used:
- p2 sensual purple from the Mirror Mirror on the Wall LE
- Biocura Fliederzauber
- essence Steel-ing the scene from the metal glam LE
- white and purple acrylic paint

That's it for now! Thanks for reading!

Mittwoch, 28. August 2013

TNCC - Around the World #1 - Mexico

Hallöchen!

There's a total of four days left in this month, so I have four days to post all four manicures for The Nail Challenge Collaborative's monthly theme. This time the theme is "Around the World". I was really happy about this at first, but in the end it gave me quite the headache as I didn't want to do my stereotypical manicures... you know, another Japan inspired one for example. For this first post, I wanted to do something ethnic and ended up with a mexican pattern. I ended up simplifying it, but I liked the result.

Vier Tage hat der Monat noch, also noch vier Tage, um die vier Manis für die Nail Challenge Collaborative zu posten. Das Thema für August ist "Around the World". Darüber habe ich mich zunächst gefreut, aber letztlich hat das Thema mir doch etwas Kopfschmerzen bereitet, weil ich nicht so auf meine üblichen verdächtigen Themen zurückgreifen wollte. Noch eine Japan inspirierte Mani zum Beispiel. Für die erste Mani wollte ich irgendein ethnisches Muster aufgreifen und habe mich dann für was mexikanisches entschieden. Das habe ich dann letztlich noch ordentlich vereinfacht, aber das Endergebnis fand ich nicht übel.


I started with two coats of essence Hello Summer!, a bright orange creme polish. It applied very nicely. I don't remember what polish I used, but next was a stripe down the middle of the nail. Using the same orange polish, Kiko 336 and white acrylic paint, I painted the triangles on top of the stripe.

When all of that was really dry, I started my little experiment with the Born Pretty Store Nailart Pen in Black. I used that to outline the stripe and triangles. I wish it the tip was a bit smaller, but it works quite well. The black dries matte and you can easily rub it off, so topcoat is a must. Apparently, I didn't let it dry long enough... I managed to damage it a little with topcoat.

Angefangen habe ich mit zwei Schichten essence Hello Summer!, einem orangenen Cremelack. Er ließ sich echt super auftragen. Ich erinnere mich leider nicht welchen Lack ich dafür verwendet habe, aber als nächstes folgte dann eine Streifen in der Mitte der Nägel. Darauf habe ich dann mit dem orangenen Lack, Kiko 336 und weißer Acrylfarbe die Dreiecke gemalt. 

Das Ganze habe ich dann wirklich gut durchtrocknen lassen und dann mein kleines Experiment mit dem Born Pretty Store Nailart Pen in Schwarz gewagt. Mit diesem Stift habe ich den Streifen und die Dreiecke schwarz umrandet. Funktionierte ganz gut, aber ich wünschte die Spitze des Stifts wäre noch etwas feiner. Den Pinsel wird er nicht ersetzen. Das Schwarz trocknet matt und lässt sich einfach wegwischen, darum ist Topcoat ein Muss. Ich habe aber wohl nicht lang genug gewartet und mir mit dem Topcoat die Umrandungen etwas versaut.

I hope you like it! :) See you next time!

Dienstag, 16. Juli 2013

Teacup inspired mani

Hi everyone,

today, I just have a quick manicure to show that was inspired by a teacup sitting on the board over my desk. I bought it in Japan and haven't used it for tea yet... shame on me. It's so cute!

Heute habe ich nur eine schnelle Mani zu zeigen, die durch eine Teetasse inspiriert wurde, die auf dem Regal über meinem Schreibtisch steht. Ich habe sie mir während meines letzten Japanaufenthalts gekauft und habe sie bis heute noch nicht für Tee benutzt. Schande, schande. Dabei ist sie echt niedlich.


Please excuse the tipwear. I took pictures on the third day of wear...
I used two coats of Barielle U-Concrete-Me as my base here, then painted the white part using essie Marshmallow and the polish brush itself. Lastly, I added the red stripes using essence It Peace.
I'm still not sure if I like it on me, but I got a couple nice compliments... so I guess, it's not all that bad.

Bitte die Tipwear mal ignorieren. Ich habe die Bilder leider erst am dritten Tragetag gemacht...
Für diese Mani habe ich mit zwei Schichten Barielle U-Concrete-Me angefangen. Dann habe ich mit essie Marshmallow und dessen Pinsel den weißen Teil aufgepinselt. Zum Schluss kamen noch die roten Strichlein in essence It Peace hinzu, und fertig. Ich bin mir immer noch nicht sicher, ob ich die Mani an mir mag, aber ich habe ein paar nette Komplimente bekommen... von daher war sie wohl nicht all zu übel.

I'll leave you with this for tonight... Tomorrow is Wednesday, so I'll have another swatch for the "Lacke in Farbe und bunt!" collaboration. Thanks for reading! See you soon!


Donnerstag, 4. Juli 2013

The Nail Challenge Collaborative - Neon - Omake

Hello!

As mentioned in yesterday's post, I'm going to do another Omake post. Obviously about the somewhat fails of my neon challenge. There are four more manicures I took pictures of that didn't make it for different reasons...


For this one, I tried my fanbrush for the first time. On a base of flormar matte M09, I first added some white acrylic paint and then some black. It wasn't uniform enough for my taste, but I kind of like it. The color combination is one I really like.

Für diese Mani habe ich den Fächerpinsel zum ersten Mal benutzt. Auf flormar M09 habe ich mit dem Pinsel erst weiße und dann schwarze Acrylfarbe aufgepinselt. Ich mag die Farben zusammen, aber meine Fächerkünster waren mir zu unregelmäßig.


Here, I tried to do a neon glitter sandwich. The Woo neons are all quite sheer, especially the green and yellow ones, which made me think of a sandwich. In the end, I chose a bright green no-name Color Club as my base, added essence edward (from the nail art twins) and topped it with one coat of the yellow Woo neon. It was okay, but turned out to be too green for my taste. ^^;

Hier habe ich mich an einem Neon-Glitter-Sandwich probiert. Die Woo-Neons sind ja recht sheer, besonders der gelbe und der grüne. Ich habe mich dann für deinen namenlosen grünen Color Club-Lack entschieden, darauf essence edward aufgetragen und darüber wiederum eine Schicht des gelben Woo Neons. War nicht übel, mir aber irgendwie zu grün.


For this one, I tried to do classic neon tips... while imitating the colors of a pair of shoes I was pondering to buy back then. (I didn't buy them...) I like the colors together, but the nude polish doesn't match with my skintone. Boo.

Hier habe ich klassische Neon-Tips machen wollen... und hatte dabei die Farben eines Paar Schuhe vor Augen, die ich letztlich nicht gekauft habe. Ich mag die Farben zusammen, aber leider passt der Nudelack nicht zu meiner Hautfarbe.


And here I tried the sugarspun technique for the first time. Same green polish as above on a coat of white. I don't think I'm patient enough for a manicure like this. It turned out to be too thick, uneven, weird. And too green. If it just were a grass green neon...

Hierfür habe ich mich zum ersten Mal an der Sugarspun-Technik probiert. Basis war wieder der selbe grüne Lack. Ich denke, ich bin nicht geduldig genug für diese Technik. Mir war's am Ende zu dick, zu ungleichmäßig und überhaupt. Und außerdem war's mir zu grün. Ein grasgrüner Neon wäre besser gewesen.

That's it... Neon manicures in the past. I'll continue to play with them, though.
Das war's auch schon. Neon-Manis rücken nun in die Vergangenheit. Aber ich werde weiter mit Neons spielen.... :P

Thanks for reading!

Mittwoch, 12. Juni 2013

H+M - Grey

Hallöchen~

Today, I have another swatch for you, a swatch I'm dedicating to the Lacke in Farbe... und bunt! collaborative once again. The color for this week is taupe... not really my color. But that's exactly why I have so many untrieds that belong in this category. So I got to kill a total of three untrieds, but I'm only going to show you two in this post.

Heute habe ich wieder einen einfachen Swatch für euch, den ich, wie letzte Woche, der Lacke in Farbe... und bunt! Aktion widme. Die Farbe diese Woche ist Taupe... nicht so wirklich meins. Aber genau deshalb habe ich so viele ungetragene Lacke in diesem Farbspektrum. Alles in allem, habe ich drei ungetragene in getragene Lacke verwandeln können~ Aber in diesem Post soll es nur um zwei gehen.


Anyway, the polish I chose is another H&M polish. This one is called... Grey. It's also from a minis set, but a different one from last week's. This one really is a mini. The bottle holds only 3.2 ml! I would never have called this shade grey. It's no grey! To me this is a light taupe. My camera is displaying it a tiny bit too violet though. It's a bit more brown than violett. I'm wearing two coats here. The first is really really sheer, but the second made it opaque on my nails. There's a light silver shimmer running through this polish, but it's not as obvious as the golden shimmer in last weeks Pink.

Auch diese Woche ist es wieder ein H&M-Lack geworden. Dieses Mal ein Lack namens... Grey. Auch dieses stammt aus einem Mini-Set, aber aus einem anderen als letzte Woche. Dieser hier ist auch wirklich mini: das Fläschchen enthält grad mal 3.2 ml! Für mich ist das hier allerdings wirklich kein Grau. Ein helles Taupe, Richtung Violett tendierend. Aber kein Grau. Meine Kamera zeigt die Farbe ein kleines Bisschen zu Violett. Denkt ihn euch ein bisschen bräunlicher. Ich trage hier zwei Schichten. Die erste deckte wirklich schlecht, aber mit der zweiten war der Lack dann deckend. Der Lack hat einen feinen silbernen Schimmer, aber leider ist der nicht so deutlich zu erkennen wie der goldene Schimmer in Pink von letzter Woche.


In the end, I found the polish a bit boring... on it's own. So I decided to layer another polish on top. One from my untrieds. So this is H&M Grey plus one coat of essence Just can't get enough (POP top coat). Just can't get enough is a brownish holo glitter, that just seemed to compliment Grey.

Letztlich fand ich den Lack allein aber irgendwie langweilig. Trotz Schimmer und allem. Also habe ich noch eine Schicht essence Just can't get enough drüber gepinselt, der sich ebenfalls zwischen meinen unbenutzten Lacken tummelte. Just can't get enough ist ein bräunlicher Hologlitter-Lack, der mir ganz gut zu Grey zu passen schien.


What do you think of this? Was meint ihr dazu?

Sonntag, 2. Juni 2013

The Nail Challenge Collaborative - Stamping - Omake

Hello everyone~

I hope you're having a great weekend! It's sunny today here in Germany! That really saved the weekend a little bit.

Anyway, I finished the May challenge yesterday, but I decided to do one more post for it. I don't know how many of you are accustomed with the term omake. It's Japanese and most would probably know it from manga, where it stands for some extra pages at the end of a volume. So in this post, I quickly want to show you a couple of stamping manicures I did over the past month that I didn't like enough to make them one of the four main posts.

Ich habe meine Mai-Challenge eigentlich gestern abgeschlossen, aber ich habe beschlossen noch ein paar weitere Stampings zu zeigen: jene, die mich nicht so ganz überzeugt haben, von mir aber beendet und auch fotografiert wurden.


This is Manhattan Sashimi Mimi with Winmax #4 (a pink scattered holo from Japan) sponged onto the sides. Then I stamped the star image and smeared it while trying to topcoat it. I like the base shade. I thought I would like essie Go Ginza better, but this one looks better with my skintone. I'm glad I went ahead and bought it.

Hier hätten wir den aktuell erhältlichen Manhattan Sashimi Mimi mit etwas Winmax #4, den ich an den Seiten gesponged habe. Das Schwarz ist der Stampinglack von Konad. Versaut habe ich es durch unsachgemäßen Auftrag des Topcoats... ;)


This one has essence Fortune Cookie as the base, stamped with Kiko 702, one of the magnetic lacquers. I went in with some light yellow and China Glaze Riveting and painted some unnecessary stripes on the side. I shouldn't have done those... Oh well.

Hier dann essence Fortune Cookie mit Stamping mit Kiko 702. Letzterer ist einer von den Magnetlacken, die stampen ganz gut. Alles noch pre-Mirror Lacke... Mit einem Dotting Tool habe ich dann noch etwas gelben und orangenen Lack hinzugefügt, aber ruiniert habe ich es letztlich mit den schwarzen Streifen an den Seiten.


Hm. I forgot what polishes I used for this one. I'm guessing essie Smooth Sailing, but not sure. I only took 5 pictures, which means I was totally unimpressed at that time. But I think the image stamped really well.

Keine Ahnung was ich hierfür verwendet habe. Ich denke es war essie Smooth Sailing, aber ich bin mir nicht ganz sicher. Eigentlich gar nicht schlecht geworden, aber ich fand es wohl doof... ich habe nämlich nur fünf Fotos gemacht.


MNY 500A is the base for this one. A really sheer white with a pink hue. At least three coats. I tried to stamp polka dots here, but the polishes ended up being too sheer and I re-applied the colors with a dotting tool. Which was "against the rules" in my opinion. I wasn't exactly fond of it anyway... and still aren't.

Hier haben wir etliche Schichten MNY 500A. Das hier sollten gestampte Polka Dots werden, aber die Lacke haben nicht so schön gestamped wie gedacht und ich habe die Punkte mit einem Dotting Tool verstärkt. Irgendwie war das gegen die Regeln...


Lastly, China Glaze Outta my Space stamped with white Konad polish. The halfmoons are essence Purple Cherry, a discontinued dark plum jelly, plus round gold glitters from BornPrettyStore. The holo was lost somehow... Not sure if I like Outta my Space with my skintone... hm. This was a pain to photograph because of those glitters. They kept glowing strangely. I originally wanted to post this one for the final mani, but I was really underwhelmed with my pictures in the end. It looked so much better in real life! Really!

Zum Schluss hätten wir eine Mani mit China Glaze Outta my Space. Das Stamping ist mit weißen Konad-Lack gemacht, die Halfmoons mit dem ausgelisteten essence Purple Cherry, auf den ich dann noch die goldenen Glitter geklebt habe. Die Mani gefiel mir gut, ich habe etliche positive Kommentar von Kunden bekommen und eigentlich sollte diese hier die vierte und letzte Mani für die Challenge werden. Leider war das ganze aber nicht wirklich zu fotografieren.

So those are the five manis I finished and took pictures of, but didn't like enough. What do you think of them?

Now, I just finished my first neon mani, the theme for June. I just checked under my UV light... the base turned out not to be a true neon, but I think it's bright enough, haha.

Until next time! Thanks for reading~

Donnerstag, 23. Mai 2013

The Nail Challenge Collaborative - Stamping - Week 3

Another four days without any posts. I can't handle my early shifts well lately. I'm just so tired afterwards that I can't muster the strength to do anything after work. Not even writing a blog post... haha. Maybe I should get my blood tested again... But! Since today was a day off, I'm here to show you another manicure for the Nail Challenge Collaborative.

In letzter Zeit bekommen mir meine Frühschichten irgendwie so gar nicht. Ich bin den ganzen Tag so müde, dass ich mich nach Feierabend zu rein gar nichts mehr aufraffen kann. Nicht mal einen kurz Blogpost zu schreiben. Vielleicht sollte ich meine Blutwerte mal wieder überprüfen lassen... Naja, egal. Heute habe ich frei und darum geht es heute weiter mit einer Maniküre für die Nail Challenge Collaborative! (Wer mitmachen möchte, wir freuen uns immer! Zur Gruppe geht's via Klick auf den Button oben rechts.)


I started with two coats of essie maximillian strasse her, a beautiful mint-ish grey, that just doesn't really seem to belong to a spring collection, but fits so well this year... the year of no spring (apparently). Afterwards, I started deciding what to do with each finger, as I planned to do different stuff to each nail.

Angefangen habe ich mit zwei Schichten essie maximillian strasse her, einem wunderschönen mintigen Grauton. Oder grauem Minzton. Whatever. Ich finde diesen Farbton sehr ungewöhnlich in einer Frühjahrskollektion, aber dieses Jahr passt es ja wie die Faust auf's Auge... Der Frühling lässt ja immer noch sehr bitten. Während ich wartete, dass der Lack trocknet, habe ich mir überlegt, was ich mit den einzelnen Nägeln anstellen wollte.


On my index and pinky, I stamped using white and fauxnad plate m60. I went in with a striper brush and some Flormar 392, a holographic glitter, to make it a little more interesting.

Auf Zeige- und kleinem Finger habe ich mit Weiß und Schablone m60 gestamped und dann einige Linien mit ein wenig Flormar 392 nachgezogen, um das Ganze etwas interessanter zu machen.

For the middle, I taped half of the nail and then stamped using China Glaze Adore and fauxnad plate m65. I originally chose another one, but the image wouldn't transfer properly. After taking of the tape, I applied some silver striping tape instead.

Meinen Mittelfinger habe ich zunächst halb abgeklebt und dann mit China Glaze Adore und Schablone m65 gestamped. Den Übergang habe ich dann mit silbernem Striping Tape überklebt.


On my ringfinger, I did some embellishing using rhinestones and micro beads. I haven't done something like this in ages. It was a lot of fun to do! I took most pictures before topcoating this nail, because I experienced those micro beads melting on me a lot once I applied topcoat. Also, new rhinestones... didn't know if they would turn cloudy.

Meinen Ringfinger habe ich mit Strasssteinchen und Mikroperlen verziert. Da ich so etwas schon lange nicht mehr gemacht habe, war das mal wieder ein netter Zeitvertreib. Die Fotos oben habe ich alle ohne Topcoat auf diesem Nagel gemacht, da es mir zu oft passiert ist, dass diese Mikroperlen sich durch den Topcoat in Wohlgefallen aufgelöst und mir alles versaut haben.

The next morning, sunday, there were a couple of hours of sun before breakfast, so I quickly snapped some more pictures. This time, with topcoat. Man, BTGN Top Sealer bubbled on me like crazy. It's like this often when there's some decoration to cover. No idea why.

Am nächsten Morgen, Sonntag, gab es ein paar Stunden Sonnenlicht, die ich schnell ausgenutzt habe, um noch ein paar Fotos zu machen. Hier jetzt komplett mit Topcoat. Der BTGN Top Sealer hat wieder geblubbert, es war kaum zum Aushalten. Ich habe das in letzter Zeit öfter. Irgendwie mag der Topcoat Unebenheiten (Verzierungen) nicht, glaube ich.


I almost regret that I didn't try it with matte topcoat before taking it off. Might have been interesting! I really like the base though. It's kind of unusual.

What do you think of this?

Here's a lot of other beautiful stamping to see:

Freitag, 17. Mai 2013

The Nail Challenge Collaborative - Stamping - Week 2

Hallihallo~

Today, I'd like to continue showing you the results of my stamping practice. I admit that I didn't really do any nail art this past week. I was just wearing plain polish... at least only stuff from my stash of untrieds. So my second manicure for this month of stamping is about a week old.

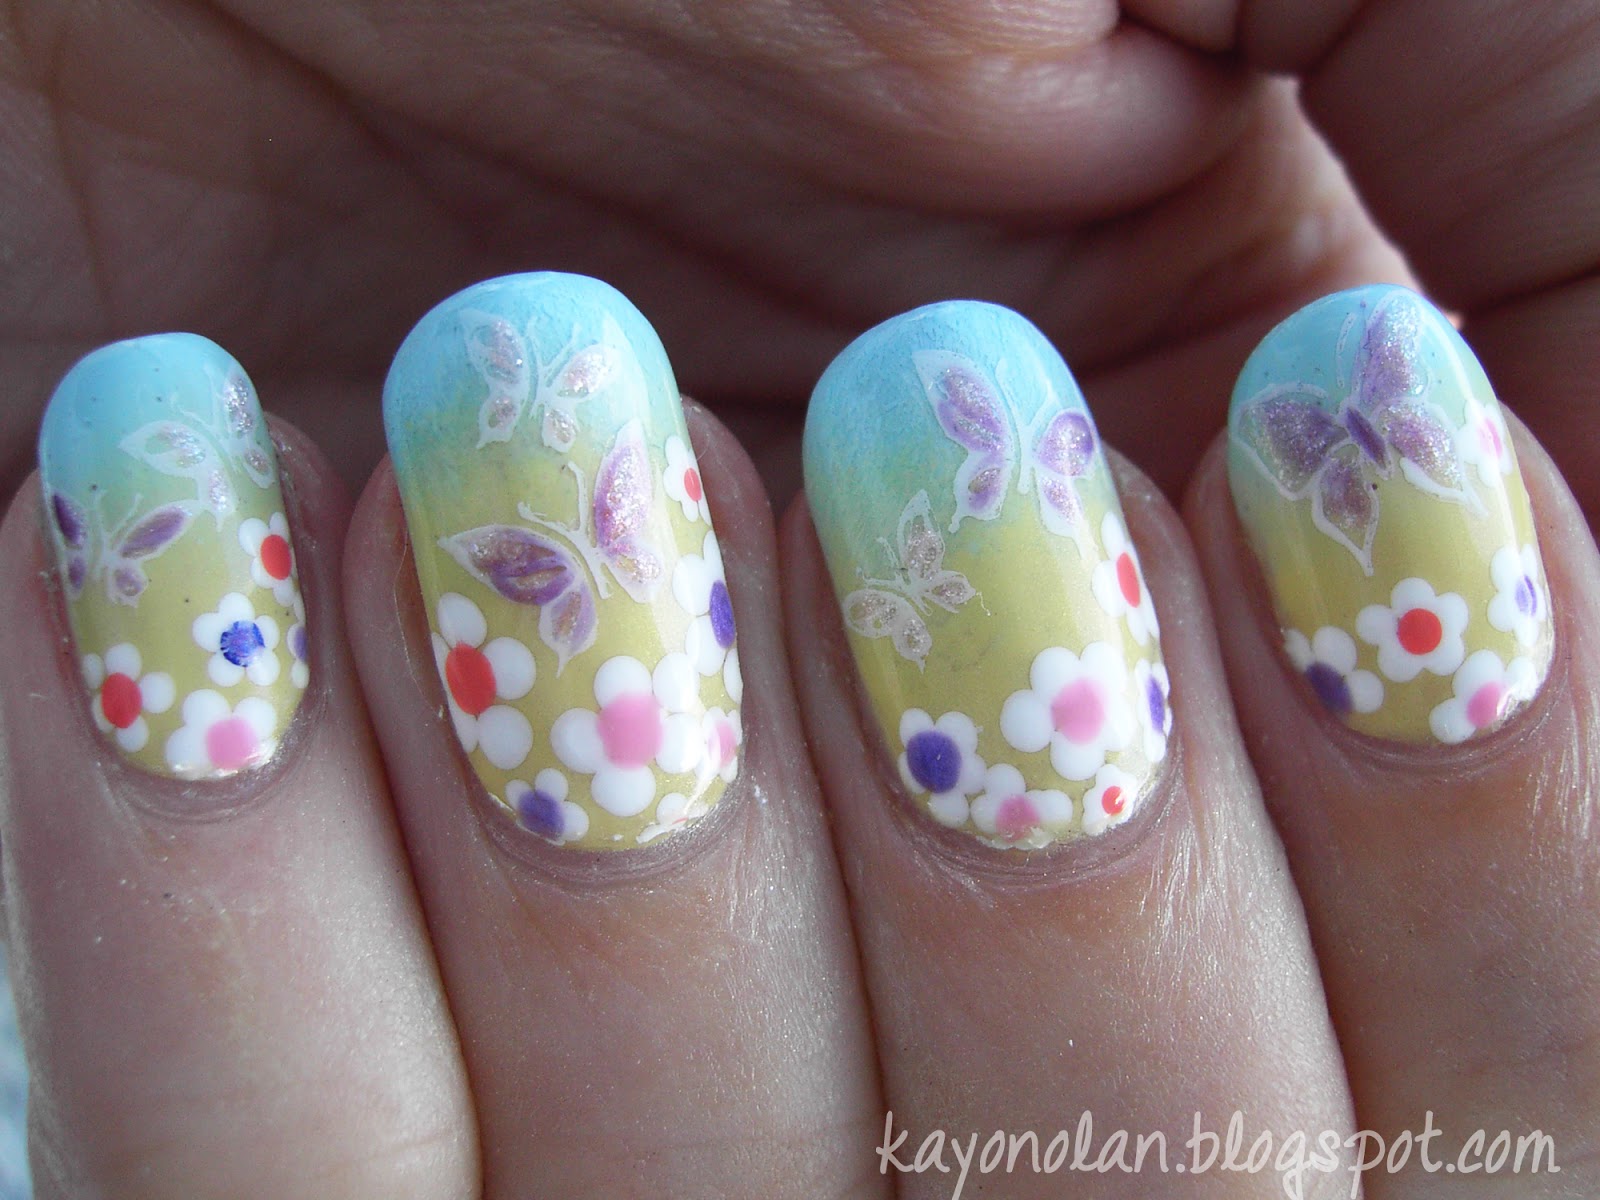
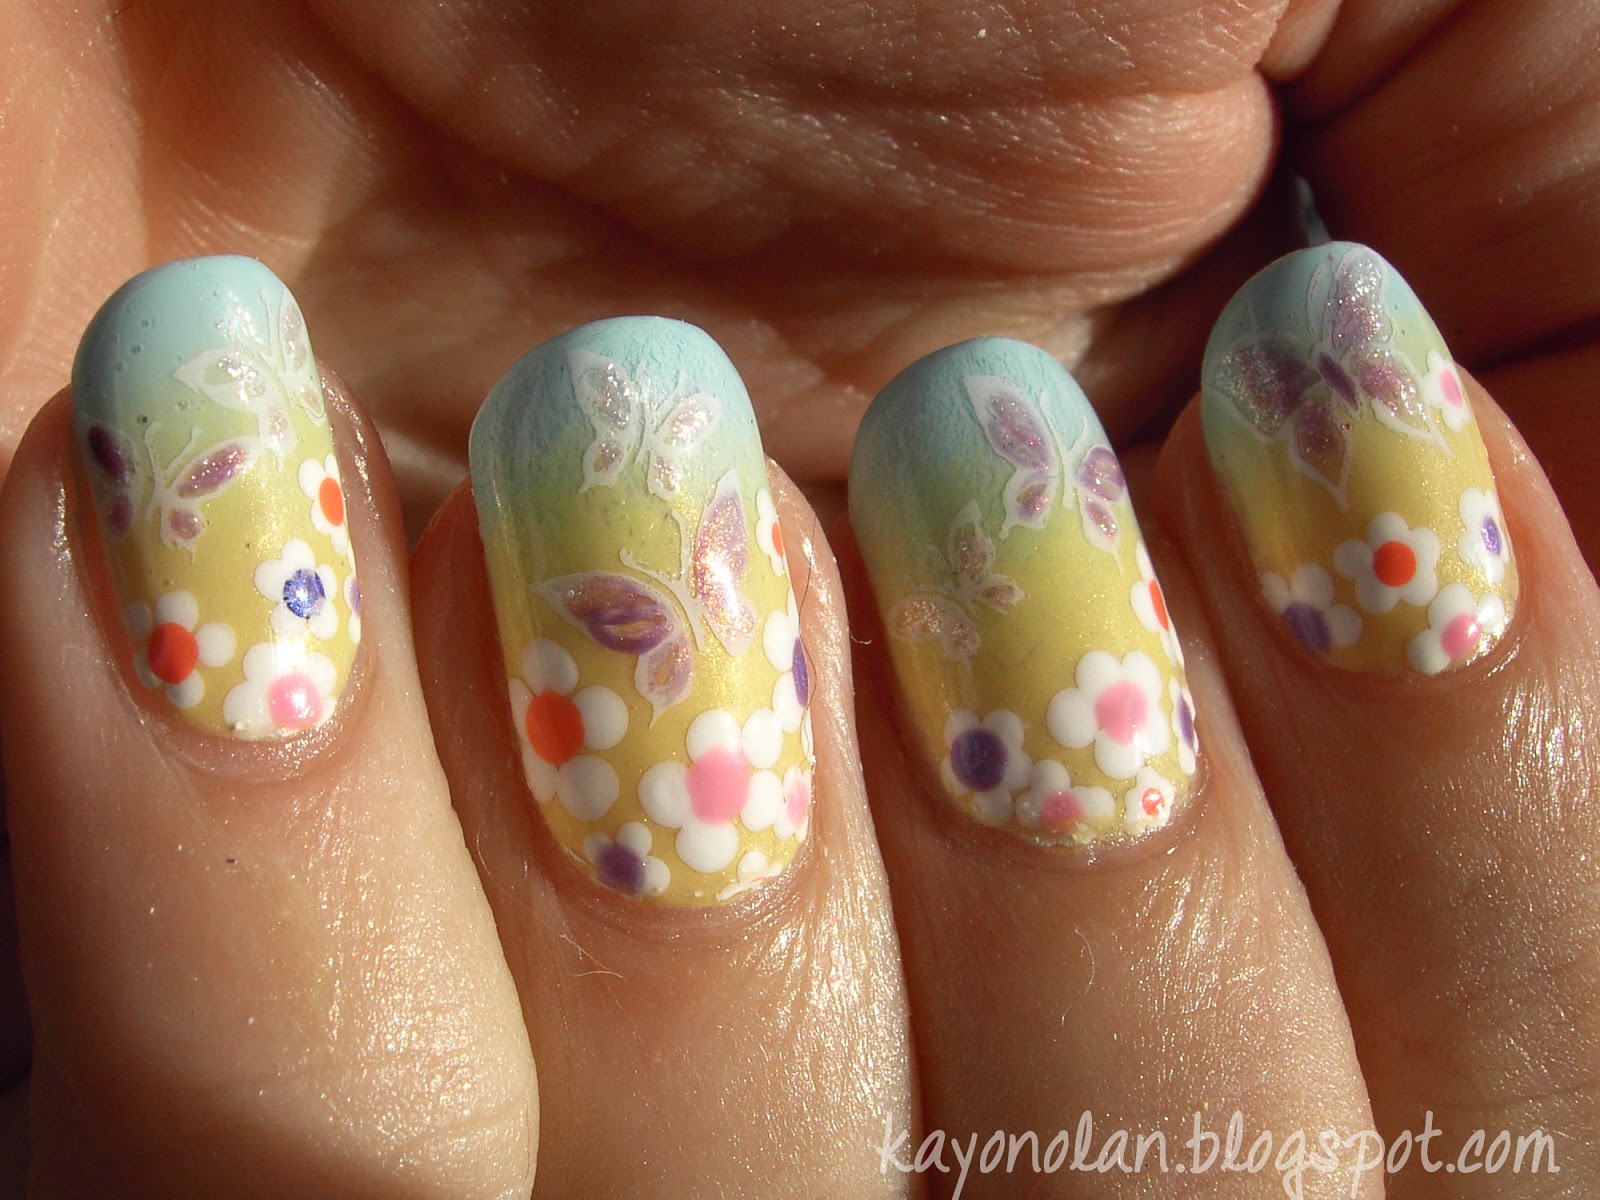
Obviously, this one is not entirely stamped. I didn't fancy any of the big designs I have that day, but the stars and butterfly images on my plates gave me a couple of ideas. I ended up with the butterflies and yet another pastel manicure.


For this mani, I started with sponging my background using essence my yellow fellow and an unnamed Color Club blue. This required a couple of coats, but sponging is kind of fun... I just hate it when I mess up on the third layer.

Für dieses Design habe ich mir zunächst einmal den Hintergrund gesponged. Verwendet habe ich dafür essence my yellow fellow und einen blauen Color Club-Lack, dessen Name mir nicht bekannt ist. Da insbesondere das Gelb nicht so super deckt, brauchte das ganze ein paar Schichten.


Next, I grabbed my dotting tool and created the little flowers near my cuticle area. I actually had to stop myself adding more and more. But I still needed some space for my butterflies. The white is acrylic paint, the colorful dots some random polishes from my untrieds.

Als nächstes habe ich mit Dotting Tool und weißer Acrylfarbe die Blümchen hinzugefügt. Hier musste ich ein bisschen aufpassen, dass ich mir nicht zu viel Fläche mit Blümchen bedeckte. Die bunten Punkte sind Lacke aus meinem nicht kleiner werdenen Haufen unbenutzer Lacke.


Lastly, I stamped the butterflies using plates H19 and fauxnad m78. I used the white stamping polish that came with my original Konad stamping set, but it turned out surprisingly sheer. That gave me the idea to go in with some other sheer colors to make the butterflies stand out a little bit. I used Milani She's so glitzy and H&M Urban Spirit. (It's a coincidence that I just posted a manicure yesterday that used Urban Spirit... I hadn't used it since...)

Zu guter letzt habe ich dann die Schmetterlingsmotive der Schablonen H19 und M78 verwendet und auf den freien Teil gestamped. Trotz Konad Stampinglack waren sie aber irgendwie nicht so intensiv, wie ich mir das vorstellte. Damit sie nicht untergehen, habe ich die Flügel noch ein wenig koloriert.


There's not much else to say about this manicure. It was kind of cute, but I wish I had used white polish for the flowers instead of acrylic paint. The flowers are a little intense... or the butterflies not intense enough. This is also the last manicure on "long" nails. I go impatient again...

What do you think?

Have a great weekend and thanks for reading! :)


Related Posts Plugin for WordPress, Blogger...