Posts mit dem Label Manhattan werden angezeigt. Alle Posts anzeigen

Donnerstag, 18. Dezember 2014

Practising the art of water marbling...

...and actually getting a little better at it!

I remember that I chose the manicures I wanted to recreate for the Nail Challenge Collaborative under the aspect of "trying again". This is another one that might not look like a total failure, but it basically is. The first one was painted, because I couldn't get the marbling right, but I liked the color combination so much, that I did it the simple way. But this time I managed to do a pretty decent water marble. Yay!


"And the third manicure for the Nail Challenge Collaborative's month of July. Another recreation. In this case a failed #watermarbling that worked out so much better this time. But it's never going to be a go-to nail art technique for me. Polishes were the same as in 2011! Essence - Replay, Manhattan - 51K, p2 - virgin."

The original manicure can be found -->here<--


I still like the original manicure. :) But... I had nubbins! That's like half of my current (December) nail length!


Dienstag, 19. November 2013

TNCC - Technique Month #1 - Galaxy Nails

Hi guys,

today, I want to show you the first manicure I intended to post for the The Nail Challenge Collaborative's September theme "techniques". I decided to try techniques that I never did before and the first thing I knew I had to try were galaxy nails. I never tried them. I know that they're not very hard to do, but you know, there are so many awesome galaxy manicures floating around the internet... and I seriously love looking at them. I didn't want to try and end up not liking mine... So I kept hesitating. But when this theme was decided, so were my first galaxy nails.

I wanted to start with an easy one, so I did not attempt to recreate real nebulae. (But those are awesome!) I'm happy with my first try and it will certainly not be the last.


It's intersting how different they look just depending on the light. They looked a little bit more awesome in real life, but my camera just couldn't capture the shimmer and the scattered holo bits.

I'm a little sad that I didn't manage to take pictures before going to work... pleae excuse the tip wear. And ignore my sad cuticles too, please. I had tears in my eyes while going through my pictures... o.o"

Materials used:
- p2 eternal
- p2 gigantic
- p2 trouble
- p2 flamboyant
- p2 attraction
- p2 elegant
- Manhattan 124
- Illamasqua Load
- KosmetikKosmo Polarlicht

Yeah, a lot of p2. I had just bought a huge batch of used ones for very little money...

Thanks for reading!

Sonntag, 21. Juli 2013

The Nail Challenge Collaborative - Flowers - Week 2 - Mosaic

Good morning everyone!

I wanted to show you this manicure way earlier, but a lot of things happened this week and I never got around to do it. My father was finally hospitalized this week to have his cancer surgery, only to be told a couple of hours before the actual surgery that it has been cancelled due to unforeseen emergency surgeries. It's supposed to happen next Wednesday now. Thus, not sure how the next week will go for me. I tend to be rather pessimistic... and having the late shift next week doesn't help. I can't really go see my dad because of visiting hours being identical to my shift. >_<
But for the time being... on to the manicure!

Diese Mani wollte ich eigentlich viel früher zeigen, aber in dieser Woche sind so viele Dinge passiert, dass ich einfach nicht dazu gekommen bin. Mein Vater kam für seine Krebs-OP diese Woche ins Krankenhaus. Allerdings wurde die OP nur wenige Stunden davor letztlich abgesagt, weil die Intensivstation mit ungeplanten Notfällen belegt war. Der neue Termin soll nun der Mittwoch sein. Keine Ahnung, wie diese kommende Woche für mich laufen wird. Ich tendiere da so zum Pessimismus... und die Spätschicht zu haben hilft da nicht gerade. Besuchen kann ich meinen Vater dann auch nicht wirklich, weil meine Arbeitszeiten sich mit den Besuchszeiten im Krankenhaus decken.
Aber für's erste mal weiter mit der Mani!


Ombre flowers. I got the idea from a tape manicure I have seen on Pinterest. I never really planned this, but since I had the idea for so long, the process had somehow already been decided before even starting. I'm not a hundred percent satisfied (because I messed it up a little with clean-up), but I liked it. I'll skip the how-to explanations this time, because I took pictures while painting my thumb and decided to include them.

Ombre-Blümchen. Die Idee kam mir nachdem ich eine Tape-Mani auf Pinterest gesehen hatte. Wirklich geplant habe ich die Blümchen nie, aber da ich die Idee so lange im Kopf hin und her gewälzt hatte, stand schon vor dem Loslegen irgendwie fest, wie ich die Idee umsetzen würde. So ganz zufrieden bin ich nicht, da ich die Mani beim Clean-Up leider mal wieder ein bisschen versaut habe, aber ich mochte sie gern. Das Wie schenke ich mir diesmal, da ich vom Entstehungsprozess der Daumenbemalung Fotos gemacht habe und diese weiter unten einfach mal einfüge.


Products I used for this mani include:
Für diese Mani habe ich unter anderem benutzt:

- Flormar M01
- light pink Color Club, unnamed
- Manhattan Sashimi Mimi
- pink Color Club, unnamed
- Kiko Apple Blossom
- Catrice Welcome to Roosywood
- Kosmetik Kosmo Binoticum
- white acrylic paint

I used those colors plus mixtures of the polishes, like light pink+Sashimi Mimi or Apple Blossom+Welcome to Roosywood, to make the ombre softer. Actually rather easy, but it looks nice, ne? If I did these again, I would do the outer lining with white polish though. I think, I wouldn't have messed it up while doing clean-up if it had been white polish. (But acrylics are so much easier to work with...)

Alle diese Farben plus deren Mischungen habe ich verwendet, damit der Ombre-Effekt möglichst weich aussieht. Eigentlich auch wieder ziemlich simpel, aber es hat irgendwie was. Sollte ich dieses Design noch mal machen - die Chancen stehen gar nicht mal schlecht - dann würde ich die äußere Umrandung aber in weißem Lack machen. Ich bilde mir ein, dass ich es beim Clean-Up nicht so versaut hätte, wenn es welcher gewesen wäre. (Nur leider arbeitet es sich mit Acrylfarbe so viel einfacher...)

Lastly my micro-tutorial on the process. I omited the final picture with topcoat... but I think, you get the idea.

Zum Schluss noch mein Mini-Tutorial zum Entstehungsprozess. Das letzte Bild mit Topcoat fehlt, aber ich denke man kann verstehen worum es geht.


Thanks for reading!


Montag, 15. Juli 2013

The Nail Challenge Collaborative - Flowers - Week 1 - Dotticure

Hi everyone,

once again starting a bit late, but here's my first post for the Nail Challenge Collaborative's next theme: Flowers. That more my thing compared to neons, so I had/have quite a few ideas. For this first mani, I was inspired by camisole I own. The colors are a bit different, but it looks quite similar.

Ich fange mal wieder tierisch früh an, aber hier ist mein erster Beitrag zum Juli-Thema der Nail Challenge Collaborative: Blumen. Das ist viel mehr mein Ding als das leidige Neon-Thema. Darum habe/hatte ich dafür auch einiges an Ideen. Diese erste Mani ist inspiriert durch ein Trägershirt, das ich mein Eigen nenne. Die Farben sind ein bisschen anders, aber es sieht schon noch ähnlich aus.


I started with two coats of a bubblegum pink Color Club polish that has no label. Then, I grabbed my palette and put a couple of drops of
- essie Marshmallow
- a yellow Color Club
- priti NYC Queen of the Pink Hyacinth
- Manhattan 51K
- p2 love connection
and started dotting my flowers using a medium sized dotting tool. In the center of the flowers, I dabbed a little gold enamel, and on top of that, I added a tiny little bit of gold glitter. Lastly, I added one coat of essence BTGN Top Sealer.

Für diese Mani habe ich mit zwei Schichten eines unbenannten rosa Color Club-Lack begonnen. Dann habe ich mir meine Palette geschnappt und von den oben genannten Lacken jeweils ein paar Tropfen draufgegeben. Mit einem mittelgroßen Dotting Tool, habe ich dann meinen Blumenteppich gepunktet. In die Mitte der Blumen habe ich ein bisschen goldene Emailfarbe gegeben und darüber noch etwas goldenen Glitter. Beendet habe ich das Ganze mit einer Schicht BTGN Top Sealer.


Taken with my Android. It was sparkling~
It's another easy manicure, it's just a bit time consuming. I had to redo my thumb, because I messed it up with topcoat... I was really wowed by my own impatience. But I was quite pleased with the result. It was bright enough for summer, but still retained a spring feeling. And it made me wear perfume... I rarely do that. I thought that was kind of funny.

Auch das ist eine eher einfache Mani, die lediglich ein bisschen Zeit braucht. Ich musste meinen Daumennagel neu machen, weil ich ihn mit dem Topcoat verschmiert hatte... man, da war ich echt mal wieder begeistert von meiner Ungeduld. Alles in allem war ich mit dem Endergebnis aber recht zufrieden. Es war bunt genug für den Sommer, hatte aber irgendwie noch was frühlingshaftes. Und was ich lustig fand... ich habe in der Zeit, in der ich diese Mani trug, jeden Tag Parfum getragen - etwas das ich sonst nicht regelmäßig tue. :D

Anyway, thanks for reading! Please take a look at the pretty flower manicures of my fellow challengers too!


Sonntag, 2. Juni 2013

The Nail Challenge Collaborative - Stamping - Omake

Hello everyone~

I hope you're having a great weekend! It's sunny today here in Germany! That really saved the weekend a little bit.

Anyway, I finished the May challenge yesterday, but I decided to do one more post for it. I don't know how many of you are accustomed with the term omake. It's Japanese and most would probably know it from manga, where it stands for some extra pages at the end of a volume. So in this post, I quickly want to show you a couple of stamping manicures I did over the past month that I didn't like enough to make them one of the four main posts.

Ich habe meine Mai-Challenge eigentlich gestern abgeschlossen, aber ich habe beschlossen noch ein paar weitere Stampings zu zeigen: jene, die mich nicht so ganz überzeugt haben, von mir aber beendet und auch fotografiert wurden.


This is Manhattan Sashimi Mimi with Winmax #4 (a pink scattered holo from Japan) sponged onto the sides. Then I stamped the star image and smeared it while trying to topcoat it. I like the base shade. I thought I would like essie Go Ginza better, but this one looks better with my skintone. I'm glad I went ahead and bought it.

Hier hätten wir den aktuell erhältlichen Manhattan Sashimi Mimi mit etwas Winmax #4, den ich an den Seiten gesponged habe. Das Schwarz ist der Stampinglack von Konad. Versaut habe ich es durch unsachgemäßen Auftrag des Topcoats... ;)


This one has essence Fortune Cookie as the base, stamped with Kiko 702, one of the magnetic lacquers. I went in with some light yellow and China Glaze Riveting and painted some unnecessary stripes on the side. I shouldn't have done those... Oh well.

Hier dann essence Fortune Cookie mit Stamping mit Kiko 702. Letzterer ist einer von den Magnetlacken, die stampen ganz gut. Alles noch pre-Mirror Lacke... Mit einem Dotting Tool habe ich dann noch etwas gelben und orangenen Lack hinzugefügt, aber ruiniert habe ich es letztlich mit den schwarzen Streifen an den Seiten.


Hm. I forgot what polishes I used for this one. I'm guessing essie Smooth Sailing, but not sure. I only took 5 pictures, which means I was totally unimpressed at that time. But I think the image stamped really well.

Keine Ahnung was ich hierfür verwendet habe. Ich denke es war essie Smooth Sailing, aber ich bin mir nicht ganz sicher. Eigentlich gar nicht schlecht geworden, aber ich fand es wohl doof... ich habe nämlich nur fünf Fotos gemacht.


MNY 500A is the base for this one. A really sheer white with a pink hue. At least three coats. I tried to stamp polka dots here, but the polishes ended up being too sheer and I re-applied the colors with a dotting tool. Which was "against the rules" in my opinion. I wasn't exactly fond of it anyway... and still aren't.

Hier haben wir etliche Schichten MNY 500A. Das hier sollten gestampte Polka Dots werden, aber die Lacke haben nicht so schön gestamped wie gedacht und ich habe die Punkte mit einem Dotting Tool verstärkt. Irgendwie war das gegen die Regeln...


Lastly, China Glaze Outta my Space stamped with white Konad polish. The halfmoons are essence Purple Cherry, a discontinued dark plum jelly, plus round gold glitters from BornPrettyStore. The holo was lost somehow... Not sure if I like Outta my Space with my skintone... hm. This was a pain to photograph because of those glitters. They kept glowing strangely. I originally wanted to post this one for the final mani, but I was really underwhelmed with my pictures in the end. It looked so much better in real life! Really!

Zum Schluss hätten wir eine Mani mit China Glaze Outta my Space. Das Stamping ist mit weißen Konad-Lack gemacht, die Halfmoons mit dem ausgelisteten essence Purple Cherry, auf den ich dann noch die goldenen Glitter geklebt habe. Die Mani gefiel mir gut, ich habe etliche positive Kommentar von Kunden bekommen und eigentlich sollte diese hier die vierte und letzte Mani für die Challenge werden. Leider war das ganze aber nicht wirklich zu fotografieren.

So those are the five manis I finished and took pictures of, but didn't like enough. What do you think of them?

Now, I just finished my first neon mani, the theme for June. I just checked under my UV light... the base turned out not to be a true neon, but I think it's bright enough, haha.

Until next time! Thanks for reading~

Samstag, 17. November 2012

Schleifchen und Pünktchen (again)

Lately, I have been going through a couple of my old blog posts, looking at the design I posted back then. I didn't change my polish/nail art as often back then and I still feel like I accomplished some great designs. But I realise that quite a bit has changed since then. My nails are way longer, I actually try to take care of my cuticles, but most of all, after one and a half year of nail art, I feel like I can do better with my paint brushes.

I had been eyeing one of my old designs for a while now: 
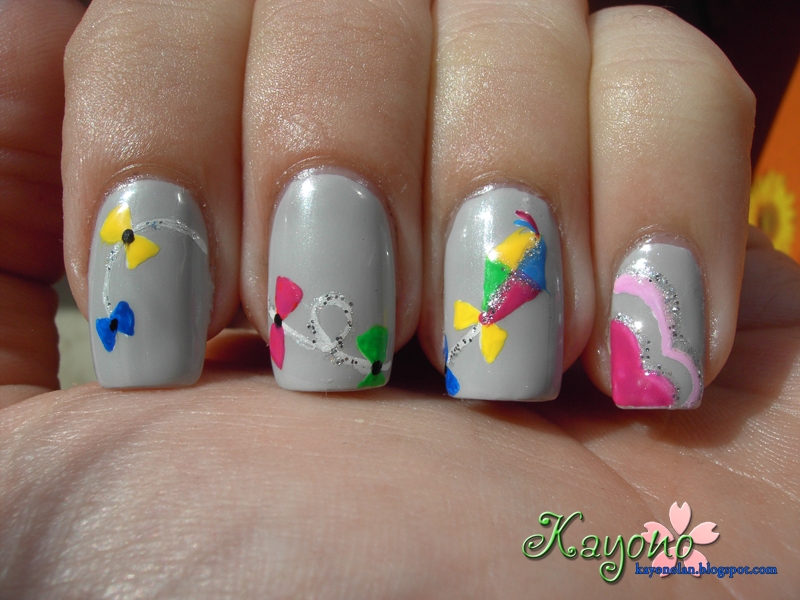
Schleifchen und Pünktchen. I really liked it and, actually surprisingly, it's currently in the top10 most viewed posts. I felt like wearing something cute again and had a couple of matching polishes on my desk: so here is a retry on this particular design. I didn't change much!


The only significant polish I changed is the white shimmery base. Instead of essence diamonds and pearls, I used W7 Polar Bear. I just had it on my desk and it's an untried, so this was decided. The other polishes are the same: p2 elegant for the tip, Manhattan 51K and Catrice Sweets of my Sweets for the ribbons. The black I used for the dots is essence black is back.


Since I wore W7 Polar Bear for the first time, I didn't know how it would behave. It's actually quite sheer. What you see here are three coats and it could have used a fourth on some nails. Luckily, it's not only sheer, but thin as well, so three coats didn't  make my nails look thick.


After painting my tips with p2 elegant, I dotted the edges with Manhattan 51K to start the lacey part. All of the lace was done with this dotting tool. One of the advantages of longer nails is certainly the increased space to paint on. I couldn't have done the lace part like this last year. It'd have covered up 1/3 of my nail.


Last time, I drew the light pink parts of the bow first and later outlined it with the darker pink. I did it the other way around this time, because it's easier to control the size of the bows that way. It worked fine - maybe due to increased brush control. The final step was adding my black dots to the tip. Well... I didn't get much better at this.


My final thoughts about this... I like the black dots in my first manicure way better. They're much more delicate. But I like the pink details better here. That's partly because of the space I had at hand this time. And even though I wasn't sure about it at first, I like Polar Bear better as the base color.

I still feel like I'm neglecting one of my favorite polishes. p2 elegant is a beautiful color and I really think I'm going to do a swatch post for this polish (even though it's discontinued). I haven't worn it since the first dots and bows mani! That's certainly the downside of being a nail polish collector...

Which one do you like better? First of second version?

Sonntag, 14. Oktober 2012

Rainbow Stripes

I can't believe this is the last day off work... I've to go back tomorrow! No more painting nails daily... boohoo. The next few weeks are probably going to be a bit tough, so I'm not sure if I'll be able to do a lot of nail art... We will see.

For today, I want to show a mani, I have been inspired to do by a post on Pinterest. I'm pretty sure most of you have seen it! It's not difficult to do, but takes a little bit of patience. I finally had the patience last saturday, sat down and did some rainbow nails!
 I did these in two steps. First, I painted my nails with the rainbow, let that dry over night and continued with the taping the next morning. That's what I mean with patience. I'd normally start taping the same night, eventually do it too early and end up pulling the base off with the tape. Hah! Didn't happen this time!

Rainbow on my left hand

Rainbow on my right hand
I used nine different polishes on my left hand, following the suggested shades from my Pinterest inspiration. I wasn't sure if it didn't end up being too much on the pink side, so I skipped those two shades on my right hand. Totally different, right?
I didn't try to do perfect stripes. They are going to be covered up mostly anyway.


This is how my right hand looked after finishing with the taping. It's bolder, less delicate than the my left hand. I still liked it better than my left hand though. It kept looking too pink to me. Well, until I felt like mattifying it.

After I mattified this mani, I suddenly liked my left hand a lot better! It's like the pink took a step backward. And, overall, I definitely liked this mani the best after I mattified it. Both hands, I mean.

I certainly have to practice with the tape, alignment and stuff. And I should get a new bottle of p2 eternal. Lots of the mistakes in this mani are due to the fact that it got a bit old... stringy... and just wouldn't do what I wanted it to do.

Lastly, there's another rainbow here. They just looked so pretty when I had them all next to each other while painting my stripes. I couldn't resist taking a picture the next day. :D


I hope everybody's week gets off to a good start! Until next time!

Samstag, 22. September 2012

Fall into Autumn 4: Cloudy Days

Aaaah, I'm so behind with my nail art this week... I was told last weekend that I have to move to another room in the house by the end of next week. Since I'm not going to be around much next week because of a seminar I'm attending, all the moving stuff has to happen before that. So instead of painting my nails, I was painting walls the last couple of days. I hurt so much every night... I didn't feel like painting my nails at all. But the bright side of the story: The "Kellerkind" (it's an idiom here in Germany basically meaning something like nerd, but if you take it literally means child living in the basement) is going to be an "Attic Cat" starting next week. Btw, has anyone seen this K-Drama?

But today, I want to present my cloudy day nails. They are not exactly cloudy, but when I was thinking what I could paint for the theme, I recollected my childhood and how we would fly kites in autumn when it was windy enough. And well, those days often were cloudy days.


I used Manhattan Lotus Effect 16 as my base color and used white acrylic paint to pre-paint the kite and cloud shapes. For the kite I used an unnamed yellow Color Club, Kiko 386, BeYu 393 and a couple of other acrylic paints. The clouds were painted using my favorite unnamed white Color Club, Priti NYC Oleaster, the already mentioned BeYu polish and pink acrylic paint.

 I really like how the clouds on my thumb look. I might do that color combo again.

But what do you think? Did you fly kites too?


Sonntag, 2. September 2012

Fall into Autumn 1: Back to School

Hi everyone~

Starting today, I'm going to participate in the newest challenge that the ladies from my challenge facebook group came up with. It's called Fall into Autumn and is going to be a fall themed challenge. It's the third challenge by this facebook group I'm going to participate in and I'm sure it'll be just as awesome as the two before. A lot of the former participants are going to join in again, as are a couple of newcomers. I can't wait to see what everybody is going to come up with.


 The first theme is Back to School... which I can't really relate to anymore. There are a couple of things you see a lot for this kind of theme, so I was thinking if there wasn't something about going to school that's special for Germany. What I came up with are Schultüten. When children enter first grade they are usually presented with a huge cardboard cone filled with all kinds of sweets, toys, etc. I googled for pictures a while a found a couple of Schultüten, that had pretty geometrical prints. On my ringfinger, I originally wanted to paint a cartoon character, which is something commonly seen on Schultüten. But my hand was quite unsteady, so I decided on a couple of numbers and letters instead.


The main colors for the geometric design are

OPI Green-wich Village
Manhattan 51K
essence Stairway to Heaven

The stripes and dots were painted using the above mentioned and
essie French Affair
OPI Stranger Tides
white acrylic paint


The base for my ringfinger is OPI Stranger Tides again. I painted the letters and numbers with white acrylic paint and outlined them with the above mentioned colors and Color Club Red-ical Gypsy. As usual, my topcoat was essence BTGN Top Sealer.

I'm not very happy with how this turned out. It's colorful. I like that, but in the end, it didn't remind me very much of a Schultüte... And I really hated myself for having such an unsteady hand that day. Oh well. I'm liking the outcome of theme 2 a lot better. :D

So far, the challenge has fourteen participants and here are the links to their respective blogs:

Stephanie Oblas A Little Polish 
Sue O'Connor Creative Nail Design by Sue
Hannah Fabiny Polished Prisms
Katee Baum A Girl and her Polish
Ashley Rowlands-Vanderzande One Nail to Another 
Karine Assemien Karinea0a
Charlotte-Louise Bennett  Charlottes Nails
Alyson Epstein Beads Nails Food
Sharra Farivar The Blahg
Maribeth Obsessive Cosmetic Hoarders Unite
Becky Barnett Glamfiend
Angie Moore OurPaintedWorld
Sarah Jürgens Dakila's

Donnerstag, 28. Juni 2012

Spring Challenge 12: May Flowers!

There's three more designs of the Spring Challenge for me to post... one of them I'll show you today.

Design 12 was supposed to be "May Flower"-themed. I don't remember if the flowers I tried to recreate actually bloom in May, but I remember seeing them around in our garden this spring. I really wanted to do a manicure that uses the colors at least, but I decided to recreate the flowers themselves for this challenge. I hope you can tell what flowers they are supposed to be... :P


Despite my love for acrylic paints, I actually did this manicure with polishes only. The ones I used are:

- Manhattan Frozen Jogurt
- Illamasqua Load
- Color Club Almost Famous
- essence A Hint of Mint
- Catrice Virgin Forest mixed with A Hint of Mint
- Color Club Incognito
- Woo 665


Color Club Incognito is a light nude shade that looks really violet here. I was a bit surprised and had to check the bottle to make sure it really is Incognito. I think it made a surprinsigly well suited background for my flowers though.


Sadly, I didn't manage to take a solo shot of my thumb nail that wasn't blurry. In my opinion the flowers looked best on my thumb. But can you tell what flowers they are supposed to be? My colleagues mostly guessed the wrong flower... But to be fair the flowers they guessed also exist in this color pattern.

Two more to go... but well, it's all about finally posting them... ehem.
Have a nice day~

Sonntag, 1. April 2012

Girly-Girl Nail Art Challenge: Day 8, Girls Just Wanna Have Fun!

So here I am with my take on the last day of our Girly Girl Nail Art Challenge. I'm kind of sad that this is going to be the last challenge manicure... Anyway, today's theme is "girl's just wanna have fun", so I don't really want to start with the sad stuff, haha.

I had some trouble coming up with an idea this time. Since I was travelling last week, I didn't get around to prepare some ideas and mani's in advance. Work this week was also more tiring than I anticipated, thus I realised that today's mani had to be rather simple. I settled with trying the acid wash technique which I have seen on several blogs over the past weeks. Inspired by the coloful manis of my fellow challenge bloggers, I decided to use bright colors also.

Here's my first try on the acid wash manicure:


The polishes I used for this mani are essie Navigate Her, depend 295, Manhattan 51K and essence Sundancer. I got the depend polish when I was travelling in Sweden last week and it's really amazing. I wish the bottles were a bit bigger though...


I was also surprised just how easy it is to achieve this manicure. I prepared this over a total of 3 days because of my lack of time. I just painted a new coat of color on top of the previous every night. On the morning of day 4 I simply took a q-tip, dipped it in acetone and started scrubbing lightly. The acetone melts the different coats of polish quite fast. The longer you scrub, the more the layers are going to show up. I think I needed a total of like 15 minutes to do both hands and I'm confident that you can be faster once you get the hang of it.


Obviously, it might be best to use one coaters because you don't have to melt away so much polish if you are doing as many colors as I did or even more. The depend polish worked great. 51K on the other hand needed two coats and when I started scrubbing, it started to discolor the yellow... I don't know, but the consistency of the polish+acetone was a bit weird. I also think that this kind of mani is actually a great way to touch up a manicure.

What do you think? Have you tried this technique before? What are your results like? Got some tips maybe?

So this was my last girly-girl manicure... This past month has been a lot of fun, I got to know a lot of wonderful new blogs and I was also really overwhelmed with the feedback I got during this time. Thank you everybody, who took the time to comment! I was, and still am, really happy to read all of your comments!

I'm pretty sure this won't be the last challenge I'm participating in, but on the other hand, I'm still sure that I can't handle the daily kind of challenge. If anyone knows of a challenge with a similar time frame or wants to create their own, I'd gladly participate!

Please take a look at all the awesome nail art everybody else has been doing to!

Stephanie of A Little Polish
Kelly of DevilishPolish
Jodi of Captivating Claws
Danielle of Lacquer Lover
Elly of Polishable
Olivia of Unprofessional Nails
Kate of This Charming Kate
Bethany of  A Plethora of Nails
Lizzy of The Do It Yourself Lady
Eugenia of Talon-ted
Lindsey of Neverland Nail Blog
Amanda of Nox Nails
Ashley of Smashley Sparkles
Sarah of See Sarah Swatch
Emily of The Lacquerologist
Jess of LuvMyLacquer
Tressa of O' Natur Nail
Amanda of Berry Polished 
Robin, Erin, and Anna of Polished Cousins
Bonny of Over Stuffed 
Taylor of REJOICE! 
Jess of Nearly Natural Nails

Donnerstag, 8. März 2012

Girly-Girl Nail Art Challenge: Day 2, Gimme That Bling

Yay~ finally done! I had sooo many ideas for today's mani and a  really hard time to decide on what I wanted to do in the end... Well, here it is:


This is actually the first time I worked with loose glitter. What a mess! It's a really nice pink holo glitter and I wanted to use this for a while. I just painted my nails with a clear polish and applied the glitter while it was still wet by pouring it out of its little tube. It's a very hungry glitter that needed 3 coats of topcoat to be smooth. But it's so sparkly! The pictures do this sparkling no justice, honestly!

On the other nails I did a check pattern using essence Purple Cherry, essence Wanna Kiss?, Manhattan 51K and some white acrylic paint. And some more glitter of course.


I took all of my pictures under simple lamplight. They are not really color accurate... a little bit too pink. I hope the sun will be out tomorrow. I'd love to try catching the sparkliness on a few more pictures. I really can't wait for summer to come. The pictures turn out soooo much better.

And lastly for Jenny... some penguins :D I did this before taking off my previous manicure!


Ah, almost forgot out growing list of participants! Make sure to check out the other girl's blogs. They did some really nice blingy manicures! <3

Lindsey of Neverland Nail Blog


Stephanie of A Little Polish

Kelly of DevilishPolish

Jodi of Captivating Claws

Danielle of Lacquer Lover

Elly of Polishable

Olivia of Unprofessional Nails

Kate of This Charming Kate

Bethany of  A Plethora of Nails

Lizzy of The Do It Yourself Lady

Eugenia of Talon-ted

Amanda of Nox Nails

Ashley of Smashley Sparkles

Sarah of See Sarah Swatch

Emily of The Lacquerologist

Jess of LuvMyLacquer

Tressa of O' Natur Nail

ChiChi of I'm just me...ChiChi 


Amanda of Berry Polished 

Robin, Erin, and Anna of Polished Cousins

Bonny of Over Stuffed 

Taylor of REJOICE! 


Related Posts Plugin for WordPress, Blogger...