Posts mit dem Label essie werden angezeigt. Alle Posts anzeigen

Sonntag, 21. Dezember 2014

Playing with nail stickers

I was really looking forward to the August theme of the Nail Challenge Collaborative. The theme was "Tea Party" and it sounded like so much fun - I voted for this theme too. In the end, I struggled quite a bit. Especially, because I didn't really have a lot of time to paint the detailed stuff I originally had in mind.

So here's the first manicure. I used some of the nail stickers I bought at Daiso a couple of years ago instead of painting the roses. Despite the low price, they're really really nice. Quite thin and flexible. You can even reposition them when you're careful. Lately, we mostly see water decals, but stickers are actually quite nice to work with too. Maybe I even find it easier. No need for the water. And I kind of like the 3D feeling some of the stickers have. Sadly, I didn't find stickers such as those the last two times I went to Japan. Not sure this will be any different when we're going there next year. (I'm sooo counting the days!!)

Sadly, I only have the pictures I used on Instagram...


"My first manicure for the Nail Challenge Collaborative's month of August. The theme this time is "Tea Party". I used essie "French Affair" as my base, topped with the new essence "Sparcle Sand" topcoat and then I just added dots and a couple of rose shaped stickers. Haven't used those in ages... effortless nailart!"

Mittwoch, 17. Dezember 2014

Practising the art of stamping...

...and still not getting much better. But I have been practising ever since and slowly... I'm getting a little better. I love the possibilities you have with stamping. Not just the images, but all kinds of different techniques, for example making your own decals.

Here's another manicure I have only posted on my Instagram so far.


"Second manicure for the Nail Challenge Collaborative's month of July. We are recreating some of our earliest manicures. I chose a different stamping plate this time. Otherwise not that different. The base is #essie Lapis of Luxury, the stamping plate was Pueen46."

My original post can be found -->here<-- It's even older than the first manicure I recreated.

Freitag, 27. Dezember 2013

Late Christmas Mani featuring essie - Angora Cardi

Good morning!

I only did a single real Christmas manicure this year. And a simple one at that. I wasn't in the mood at all and honestly, I'm glad it's over for the next 48 weeks. I'll stay with my wintery manicures. Those are more my cup of tea.

Dieses Jahr habe ich nur eine einzige Weihnachtsmani gepinselt und eine super einfache noch dazu. Ich war echt so gar nicht in Weihnachtsstimmung und bin auch ziemlich froh, dass jetzt erst mal wieder 48 Wochen Ruhe ist. Ich bleibe da lieber meinen winterlichen Manis, das ist mehr meins.

I wanted to create a simple manicure using one of my untrieds, essie Angora Cardi. I remember seeing a manicure similar to this, but I think they used green. Even though it's so simple, I got a couple of nice comments on it.

Ich wollte was ganz einfaches haben und dabei einen meiner vielen unbenutzten Lacke verwenden, den essie Angora Cardi. Ich hatte mal so eine ähnliche Maniküre irgendwo gesehen, die aber grünen Lack verwendet hat, glaube ich. Obwohl das ganze so simpel war, habe ich aber doch ein paar nette Kommentare bekommen. Das erfreut das Herz. :)


Products used:
- essie Angora Cardi (2 coats)
- Revell Email color

Thanks for reading!!

Sonntag, 15. Dezember 2013

TNCC - Favorite Color - #4

Hi,

since I finally finished my first manicure for the December theme, I feel like I have to rush this post a little bit... This is my final manicure for the Favorite Color month of the Nail Challenge Collaborative.

I tried making stamping decals for the first time. I ordered my first MoYou plates a little while ago and this one image on Suki plate #6 actually reminded me of a pattern I saw in Japan. I guess I shouldn't have tried doing full nail decals when trying for the first time, but I think the manicure turned out okay. Of course, there's a lot of room for improvement, but I think you'll see me try again with stamping decals. There are some nice combinations possible - especially with the MoYou plates I got....


Sorry for the crappy pictures. All of them were taken on day three, hence the damage at the tips.

Products used:
- essence gabriella (from the first range of nail art twins)
- essie good as gold
- Barielle Pin Up
- MoYou London - Suki plate #6

For the stamping process itself, I followed this tutorial - the first that pops up when you search for stamping decals on google. ^^;

What do you think? Have you tried making stamping decals and do you have any tips to share?
Thanks for reading!

Dienstag, 16. Juli 2013

Teacup inspired mani

Hi everyone,

today, I just have a quick manicure to show that was inspired by a teacup sitting on the board over my desk. I bought it in Japan and haven't used it for tea yet... shame on me. It's so cute!

Heute habe ich nur eine schnelle Mani zu zeigen, die durch eine Teetasse inspiriert wurde, die auf dem Regal über meinem Schreibtisch steht. Ich habe sie mir während meines letzten Japanaufenthalts gekauft und habe sie bis heute noch nicht für Tee benutzt. Schande, schande. Dabei ist sie echt niedlich.


Please excuse the tipwear. I took pictures on the third day of wear...
I used two coats of Barielle U-Concrete-Me as my base here, then painted the white part using essie Marshmallow and the polish brush itself. Lastly, I added the red stripes using essence It Peace.
I'm still not sure if I like it on me, but I got a couple nice compliments... so I guess, it's not all that bad.

Bitte die Tipwear mal ignorieren. Ich habe die Bilder leider erst am dritten Tragetag gemacht...
Für diese Mani habe ich mit zwei Schichten Barielle U-Concrete-Me angefangen. Dann habe ich mit essie Marshmallow und dessen Pinsel den weißen Teil aufgepinselt. Zum Schluss kamen noch die roten Strichlein in essence It Peace hinzu, und fertig. Ich bin mir immer noch nicht sicher, ob ich die Mani an mir mag, aber ich habe ein paar nette Komplimente bekommen... von daher war sie wohl nicht all zu übel.

I'll leave you with this for tonight... Tomorrow is Wednesday, so I'll have another swatch for the "Lacke in Farbe und bunt!" collaboration. Thanks for reading! See you soon!


Montag, 15. Juli 2013

The Nail Challenge Collaborative - Flowers - Week 1 - Dotticure

Hi everyone,

once again starting a bit late, but here's my first post for the Nail Challenge Collaborative's next theme: Flowers. That more my thing compared to neons, so I had/have quite a few ideas. For this first mani, I was inspired by camisole I own. The colors are a bit different, but it looks quite similar.

Ich fange mal wieder tierisch früh an, aber hier ist mein erster Beitrag zum Juli-Thema der Nail Challenge Collaborative: Blumen. Das ist viel mehr mein Ding als das leidige Neon-Thema. Darum habe/hatte ich dafür auch einiges an Ideen. Diese erste Mani ist inspiriert durch ein Trägershirt, das ich mein Eigen nenne. Die Farben sind ein bisschen anders, aber es sieht schon noch ähnlich aus.


I started with two coats of a bubblegum pink Color Club polish that has no label. Then, I grabbed my palette and put a couple of drops of
- essie Marshmallow
- a yellow Color Club
- priti NYC Queen of the Pink Hyacinth
- Manhattan 51K
- p2 love connection
and started dotting my flowers using a medium sized dotting tool. In the center of the flowers, I dabbed a little gold enamel, and on top of that, I added a tiny little bit of gold glitter. Lastly, I added one coat of essence BTGN Top Sealer.

Für diese Mani habe ich mit zwei Schichten eines unbenannten rosa Color Club-Lack begonnen. Dann habe ich mir meine Palette geschnappt und von den oben genannten Lacken jeweils ein paar Tropfen draufgegeben. Mit einem mittelgroßen Dotting Tool, habe ich dann meinen Blumenteppich gepunktet. In die Mitte der Blumen habe ich ein bisschen goldene Emailfarbe gegeben und darüber noch etwas goldenen Glitter. Beendet habe ich das Ganze mit einer Schicht BTGN Top Sealer.


Taken with my Android. It was sparkling~
It's another easy manicure, it's just a bit time consuming. I had to redo my thumb, because I messed it up with topcoat... I was really wowed by my own impatience. But I was quite pleased with the result. It was bright enough for summer, but still retained a spring feeling. And it made me wear perfume... I rarely do that. I thought that was kind of funny.

Auch das ist eine eher einfache Mani, die lediglich ein bisschen Zeit braucht. Ich musste meinen Daumennagel neu machen, weil ich ihn mit dem Topcoat verschmiert hatte... man, da war ich echt mal wieder begeistert von meiner Ungeduld. Alles in allem war ich mit dem Endergebnis aber recht zufrieden. Es war bunt genug für den Sommer, hatte aber irgendwie noch was frühlingshaftes. Und was ich lustig fand... ich habe in der Zeit, in der ich diese Mani trug, jeden Tag Parfum getragen - etwas das ich sonst nicht regelmäßig tue. :D

Anyway, thanks for reading! Please take a look at the pretty flower manicures of my fellow challengers too!


Samstag, 1. Juni 2013

The Nail Challenge Collaborative - Stamping - Week 4

Hi~

today, I'm going to complete my second month of the Nail Challenge Collaborative's May challenge: stamping. I tried to do different things for all four weeks, so for the last of the four manicures, I decided to try to recreate one of my earliest inspiration pictures I saved back in 2011: a manicure by Emerald Sparkled.

The inspiration mani is quite special to me. I loved it so much, that I even went ahead and searched for the perfect polishes to do this. In the end, I bought them, but hadn't even swatched them to this day. Kind of sad, isn't it?

So the base for this mani is H&M U Must Have This. I love the name... remember: I bought it just for this mani... like two years ago! Haha... It's a teal leaning sky blue creme bordering on what I imagine a neon blue to be. Application was smooth, but drying time leaves quite a bit to be desired.

Diese Mani habe ich mit zwei Schichten H&M U Must Have This begonnen. Den Lack habe ich ursprünglich extra mal für die Replikation dieser Mani gekauft, aber letztlich bis zu diesem Versuch nicht mal geswatched. Das ist zwei Jahre her. Keine Ahnung, ob es den Lack noch zu kaufen gibt, aber dieses Türkis gefällt mir immer noch sehr gut. Vom Auftrag her prima, aber leider war die Trockenzeit nicht so die beste.


When my base seemed dry, I tried taping of a part to cover it from the brown polish I applied on top. Sadly, that didn't work properly, because the base wasn't really dry even after 30 min. So I painted the brown part by hand using Color Club Rebel Spirit. It turned out darker than I thought. Looks almost black, doesn't it?

Als nächstes habe ich versucht einen Bogen abzukleben, damit das Türkis unter dem Braun erhalten bleibt, aber leider hab ich mir damit Teile vom Lack abgezogen, weil er selbst nach 30min noch nicht ausreichend trocken war. Daher habe ich die braunen Teile letztlich per Hand gemalt. Das Braun, das leider sehr dunkel ausgefallen ist, ist Color Club Rebel Spirit.

After letting that dry, I continued with the stamping using essie Good as Gold and plate A07. There are several mirrored images on this plate and I chose two of them to stamp to create a larger image. As you can tell... my aligning leaves a lot to be desired too. I'll have to practice that. Some parts didn't transfer properly, so I went in with a fine brush to fill in. I finished the whole thing with a thick layer of topcoat.

Mit essie Good as Gold und Schablone A07 habe ich dann das Ornament aufgestempelt. Auf der Schablone gibt es einige gespiegelte Motive, aus denen ich zwei ausgewählt habe, um das größere Muster zusammenzusetzen. Das mit der Symmetrie muss ich aber noch üben. Teile, die sich nicht ganz übertragen ließen, habe ich mit einem feinen Pinsel dann aufgefüllt.


Lastly, here are two pictures of the base on its own. It's pretty (and has been sitting in my untrieds forever), so it deserves some attention.

Und zum Schluss den Basislack noch mal solo. Verdient er irgendwie... nach dem ich ihn so lange auf seinen Einsatz habe warten lassen. 


So that was the stamping challenge. I sure stamped a lot this past month and I think I got a little better at it. It's not as scary anymore. I'm currently waiting for a set of Bundle Monster plates and I can't wait to play around with those. Especially, because my ordered Kiko Mirror polishes are sitting on my desk waiting!

On to the next challenge... which will be neons! So summer has arrived, I guess? Not here in Germany though. :((

I hope everyone has a nice weekend! Until next time!


Donnerstag, 23. Mai 2013

The Nail Challenge Collaborative - Stamping - Week 3

Another four days without any posts. I can't handle my early shifts well lately. I'm just so tired afterwards that I can't muster the strength to do anything after work. Not even writing a blog post... haha. Maybe I should get my blood tested again... But! Since today was a day off, I'm here to show you another manicure for the Nail Challenge Collaborative.

In letzter Zeit bekommen mir meine Frühschichten irgendwie so gar nicht. Ich bin den ganzen Tag so müde, dass ich mich nach Feierabend zu rein gar nichts mehr aufraffen kann. Nicht mal einen kurz Blogpost zu schreiben. Vielleicht sollte ich meine Blutwerte mal wieder überprüfen lassen... Naja, egal. Heute habe ich frei und darum geht es heute weiter mit einer Maniküre für die Nail Challenge Collaborative! (Wer mitmachen möchte, wir freuen uns immer! Zur Gruppe geht's via Klick auf den Button oben rechts.)


I started with two coats of essie maximillian strasse her, a beautiful mint-ish grey, that just doesn't really seem to belong to a spring collection, but fits so well this year... the year of no spring (apparently). Afterwards, I started deciding what to do with each finger, as I planned to do different stuff to each nail.

Angefangen habe ich mit zwei Schichten essie maximillian strasse her, einem wunderschönen mintigen Grauton. Oder grauem Minzton. Whatever. Ich finde diesen Farbton sehr ungewöhnlich in einer Frühjahrskollektion, aber dieses Jahr passt es ja wie die Faust auf's Auge... Der Frühling lässt ja immer noch sehr bitten. Während ich wartete, dass der Lack trocknet, habe ich mir überlegt, was ich mit den einzelnen Nägeln anstellen wollte.


On my index and pinky, I stamped using white and fauxnad plate m60. I went in with a striper brush and some Flormar 392, a holographic glitter, to make it a little more interesting.

Auf Zeige- und kleinem Finger habe ich mit Weiß und Schablone m60 gestamped und dann einige Linien mit ein wenig Flormar 392 nachgezogen, um das Ganze etwas interessanter zu machen.

For the middle, I taped half of the nail and then stamped using China Glaze Adore and fauxnad plate m65. I originally chose another one, but the image wouldn't transfer properly. After taking of the tape, I applied some silver striping tape instead.

Meinen Mittelfinger habe ich zunächst halb abgeklebt und dann mit China Glaze Adore und Schablone m65 gestamped. Den Übergang habe ich dann mit silbernem Striping Tape überklebt.


On my ringfinger, I did some embellishing using rhinestones and micro beads. I haven't done something like this in ages. It was a lot of fun to do! I took most pictures before topcoating this nail, because I experienced those micro beads melting on me a lot once I applied topcoat. Also, new rhinestones... didn't know if they would turn cloudy.

Meinen Ringfinger habe ich mit Strasssteinchen und Mikroperlen verziert. Da ich so etwas schon lange nicht mehr gemacht habe, war das mal wieder ein netter Zeitvertreib. Die Fotos oben habe ich alle ohne Topcoat auf diesem Nagel gemacht, da es mir zu oft passiert ist, dass diese Mikroperlen sich durch den Topcoat in Wohlgefallen aufgelöst und mir alles versaut haben.

The next morning, sunday, there were a couple of hours of sun before breakfast, so I quickly snapped some more pictures. This time, with topcoat. Man, BTGN Top Sealer bubbled on me like crazy. It's like this often when there's some decoration to cover. No idea why.

Am nächsten Morgen, Sonntag, gab es ein paar Stunden Sonnenlicht, die ich schnell ausgenutzt habe, um noch ein paar Fotos zu machen. Hier jetzt komplett mit Topcoat. Der BTGN Top Sealer hat wieder geblubbert, es war kaum zum Aushalten. Ich habe das in letzter Zeit öfter. Irgendwie mag der Topcoat Unebenheiten (Verzierungen) nicht, glaube ich.


I almost regret that I didn't try it with matte topcoat before taking it off. Might have been interesting! I really like the base though. It's kind of unusual.

What do you think of this?

Here's a lot of other beautiful stamping to see:

Sonntag, 14. April 2013

Let it Snow! Challenge 14: Winter Blues

Hi everyone,

until last week I sure had the Winter Blues, namesake for Let it Snow! week 14. But this past week, spring finally has arrived here in Germany. Every day, when I take my dog for a walk it's becoming more and more evident to me. Finally!

But well, there's three Let it Snow! manicures left to show and I'd like to make it one less by showing your my Winter Blues mani. I wanted to do something in wintery colors, but not exactly winter themed. I really liked the concept of the pastel check mani I did past fall and decided to use that as the base. But instead of three colors, I only used a single one.


I used Anny Sporty Snowflake as my base. It's a shimmery grey polish, rather sheer, but thus delicate enough. Then, I picked essie Bikini so Teeny and painted stripes in one direction, waited a little bit and continued with painting the crossing stripes. Bikini so Teeny is quite sheer as well, but once you add a second coat, it builds up nicely. So it's a lot darker where the stripes cross each other. Using Catrice Nautica, I added the halfmoons, dots and thin stripes. I finished with a thick coat of essie good to go and placing a couple of rhinestones.


I liked this design quite a lot and even got nice comments from my family who's still not very fond of my hobby. I just wish my nails had been a bit longer... but they're even shorter now, so I shouldn't complain.

If you look closely, you might notice a little mistake I made on my index. I was rather impatient in doing my right hand and ended up denting my left index nail. I even ended up doing that nail a total of four times. When I noticed my mistake, I just didn't feel like doing it again... Well, for one of the strokes, I seem to have grabbed the other light blue I had picked, essie Lapiz of Luxury. That mistake is a first for me. ^^;

What do you think?
Thank you for reading~

Freitag, 5. April 2013

Let it Snow! Challenge 11: Valentine's Day

Hallo zusammen!

About two months late, I'd like to show you my Valentine's nails. Valentine's Day was theme 11 from the Let it Snow! Challenge. I still had some ideas from last year's brainstorming, but I ended up being inspired by another nail artist.

Compared to the original, I changed colors to a couple of untrieds in the purple range. It still works with the silver. I sponged the gradient (yes, another gradient) on top of two coats of white polish. It took two layers of sponging though, because some of the polishes turned out to be quite sheer. The hearts were painted with a dotting tool, because I was too lazy for a brush.


At first, I was kind of worried if those colors make my nails look frozen. But I think it's fine... I got to use my first essie, French Affair, again. I wonder why I always end up using this polish for Valentine's nails..? :D

Thanks for reading!


Samstag, 22. Dezember 2012

Kiko - 352 layered over NYX - Algae

Hi everyone.

Today, I have a couple of a gorgeous pictures of one of my first Kiko polishes for you. I'm talking about Kiko 352, also known as Emerald Nebula. It was part of last year's winter collection called Light Impulse. The polishes all have "hologram nail lacquer" written on their bottle, but that was very misleading... there's nothing holo about them. They're gorgeous still! Instead of a holographic effect, there's a light hidden duochrome effect.

Since Emerald Nebula is rather sheer, I layered it over another matching polish. I chose NYX Algae for this task. It had been in my untried stash ever since I bought it, but it's perfect underwear for Emerald Nebula.


This is one coat of Emerald Nebula over two coats of NYX Algae. Emerald Nebula is a tiny bit goopy, but applies just like my other Kiko polishes: easy! It levels nicely and drying time is good.

The emerald green almost has some magical sheen to it... But it's the tiny golden flakes that make the polish so special. I just love the combination of teal and gold. No wonder I bought it, despite the (high) price. (5€ for one polish was still a lot for me a year ago... haha)


Looking at the whole combination... someone please tell me, why I didn't wear any of those polishes until September!? I should probably go on a no-buy for while...

Lastly, a couple of pictures of NYX Algae on its own.


I played a bit with different topcoats here. On my pointer it's with essence BTGN Top Sealer and my on my ringfinger with essie Matte about you. Both topcoats kind of change the base color, don't they? I think I like it best without any. Something that won't happen...

Thanks for looking!
Until next time!

Freitag, 21. Dezember 2012

Pastel Check

Hi everyone!

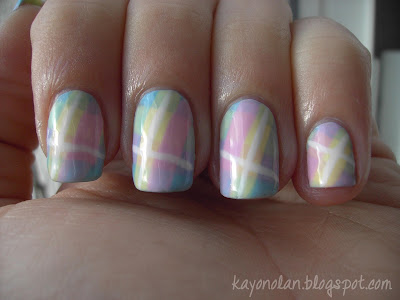
With this post, I'd like to show you some incredibly simple yet eyecatching nail art. I stumbled upon the idea on a >Korean blog< I'm following. The idea is creating a checkered pattern by layering sheer polishes. The original post uses an actual nail art kit including three sheer polishes in pink, blue and yellow and I decided to go through my stash and look for similar colors.

I decided to use
- essie French Affair (pink)
- Rival de Loop 481l (yellow)
- BeYu 142 (blue)

My polishes are far from being as sheer as the Korean ones, but they're sheer enough and worked quite well.


So what you have to do for this mani is really simple. You just apply stripes of each color next to each other until you reach your desired grade of opacity. You don't have to be very accurate painting those stripes. When that's dry, you take the same colors again and paint one more layer of stripes in a 90 degrees angle. Layering the sheer polishes over another creates new colors such as orange or green. Just like the original post, I took a white striper and added some lines. Mine turned out a bit thick though. One thick layer of essence BTGN Top Sealer sealed off my mani and made my white stripes even thicker. But also very shiny~


I got quite a lot of comments on this one and when I explained how easy it was, they wouldn't believe it. But it really was easy. The most annoying thing about this mani was the clean-up, because I didn't paint very neatly. This mani was quickly done, fun to do and the result is great. Nice idea! I like it!

I think this could look very nice with other sheer polishes too, layered over white or something. Maybe that's a way I can use my sheer nudes. Or a sheer white, sheer blue, sheer green for some wintery nails. I might have to try that soon...

What do you think about this idea?

Donnerstag, 13. Dezember 2012

Catrice - Lavender Breeze stamped

Today, I'd like to show you an oldie... even though it's not the oldest from my picture stash. It's the first manicure I did after breaking my pinky nail. I wanted to divert the attention from my pinky and thought that light polishes would do the job.

I decided on Catrice Lavender Breeze which was part of some LE back in 2010, I think. It was from before the time Catrice became available to me. It goes on rather smoothly concidering it's a purple tinted white polish. (I think the name actually fits the polish!) I used two coats for this manicure.


For the stamp, I used essie Nothing Else Metals from the mirror metallics. I originally wanted to use a playful floral stamp, but after the first nail (my pinky), I couldn't get the image to stamp again. I gave up after about 20 tries. That's when I switched to another image, that stamped perfectly.


Despite the stamping problems, I really like the outcome. I wish I had had more time at hand back then, so I could have redone the pinky nail, but because of a dinner party, I had to leave it like that.

Do you think I diverted enough from my broken pinky nail?

Dienstag, 11. Dezember 2012

Let It Snow! Challenge 1: Snowflakes

...or: In Memory of my favorite sweater.

I guess it was to be expected, but I'm going to participate in the newest seasonal challenge by same group of bloggers who did the past three challenges. The group decided to name itself The Nail Challenge Collaborative from now on. Makes it easier to refer to the group. So two weeks late, I'm starting to post my first manicure for the new Let It Snow challenge.

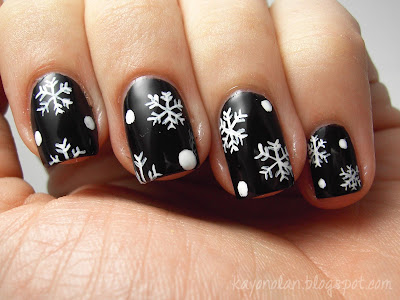
At first, I wanted to do something totally different. I bought a new skirt last winter and I loved the snowflake print on the label. I wanted to recreate this print, but failed somewhat. I can't find the label after my last move... -.-" But the same day, I got some sad news... my favorite sweater was ruined... A pair of new green jeans discolored my snowflake sweater. Even after trying to reverse the process three times, the white parts stay bright green. So in memory of this sweater, I did another snowflake mani - a more or less classic one.


Excuse the following pic spam... :P


I used only few materials for this mani, obviously. On top of two coats of essence Black is Back, I painted my white snowflakes using acrylic paint. One coat of essence BTGN Top Sealer on top to seal it.


While painting these nails, I thought once more that I really want some more pigmented white acrylic paints. I got a couple of paints for free at work yesterday and I hope some of the brands are worth the money I usually would have had to pay for them. :)

And here two pictures of the first snowflake mani I did. The other one looks nicer, right!?


For this one, I used essence trendsetter, essie Good as Gold, Orly Solid Gold and Kleancolor Metallic Pink.

Thanks for looking!


Related Posts Plugin for WordPress, Blogger...