Posts mit dem Label Spring Challenge werden angezeigt. Alle Posts anzeigen

Donnerstag, 5. Juli 2012

Spring Challenge 14: Retro Roses

Hi everyone~

Today I want to show you my last design for the Spring Challenge! The *final* one! Yay~

Well, this one was probably the easiest design. Not because it was easy to paint, but because I knew what I wanted to do for weeks. I saw these retro designs in nail magazines this spring and really wanted to do one. So why not do one for the freestyle design No. 14!?


I started out with Kiko 389 Mint Milk as my base color. Mint Milk is a gorgeous light turquoise creme and I understand very well why so many other polish enthusiasts love this polish. It's opaque in two coats and applies like a dream. It also dries to a very glossy finish.


When my base was dry, I painted the white stripes using an essence tip painter. I had almost forgotten about my tip painters... they are actually quite handy at times, haha. Afterwards, I picked another Kiko polish, 377 Apple Blossom. It's a dusty rose creme that appears to be a bit more sheer than Mint Milk. I haven't worn it solo yet. I just dabbed it onto my nails randomly. Next, I picked the only elf polish in my collection, unnamed it is, but a nice darkened pink that looked great with Apple Blossom. I used this one and a dotting tool to paint the roses. It's just half moon shapes going from the center of the blossom to the outside.


Lastly, for the leaves I used essence A Hint of Mint (lots of Mint going on...) and OPI Jade is the new Black. Using the very same dotting tool, I added little triangles where I wanted my leaves. One coat of essence BTGN Top Sealer to make it all glossy and it was done.

I finished the design about half an hour before I went to work and took my pictures when I came back. That's why there is a bit of tipwear. I loved this design and wore it for a week straight! I only took it off, because my left hand nails decided to break. I'm still very sad about that. I just did my nails again and there's so little space to paint on! I guess I have to change my plans for the Summer Challenge a bit. Oh well.

That's it for the Spring Challenge! I was doing this about 6 weeks longer than I had anticipated, but I'm glad I pulled through. I didn't want to give up, hehe. I'm planning on continuing with the Summer challenge created by the lovely ladies that did the Spring Challenge with me. There are some great themes to do!

What do you think of my final Spring design? Have you used any of these Kiko polishes?

Montag, 2. Juli 2012

Spring Challenge 13: The Paper Gal (Newspaper Transfer)

I really don't know what's going on lately, but bad things keep happening again. First, my notebook died on me, so I had to get myself a new one. A day later I was diagnosed with a dead tooth thanks to the dental braces I wore until about a year ago. More money gone. And friday my router died too, so I had a weekend with no internet. That was probably the worst. I'm using an old one for now, but it's not working properly, so I'll probably have to spend some more money to get myself a new router. Just why are those things always happening at the same time!?

Well, I used my offline time to work on the many pictures that are still sitting in my blog folder. So today, I present my take on the 13th take of the Spring Challenge. The theme was pretty open. It just had to include a newspaper transfer.

I didn't really think this one would be a problem, because I have done newspaper transfers before and it worked just fine. Not this time though. Just like a lot of other participants in this challenge I was sitting on this mani for hours, trying to make the transfer work.


I had seen a mani before that looked pretty similar to what I did here, but it was some kind of lace sticker. When I saw it, I had the idea to do a use newspaper here instead of the the patterned lace sticker. In theory not even a difficult design. In theory...

I started with two coats of Color Club Little Miss Paris. Then, I taped off a chevron, to create the french using Kleancolor Holo Pink. When that was dry, my misery began. The plan was cutting thin lines from a newspaper and transfering it along the french edges. But it wouldn't work. I tried different alcohols (rubbing + vodka), all kinds of newspaper, dipping the newspaper in the alcohol, dipping my nail into the alcohol and then putting the newspaper on my nails. All I did was smudge the pink polish.


I noticed that the newspaper would only transfer slightly on the pink holo, so I started to wonder if my nail polish may be too smooth!? Then, I had an idea that proved successful at last. When essence changed their range of goods this spring, they started selling a base coat called studio nails 24/7 nail base. The interesting thing about this base coat is the fact that it is drying to a velvety finish providing grip to any nail polish. So along the inner edge of my french, I applied a thin stripe of this basecoat... on top of Little Miss Paris, let that dry and then tried to transfer my newspaper again.


...and it worked! Still not as well as the last time, but something was finally happening. After I had transfered newspaper to all ten nails, I painted the white lace design around it and finished the whole thing with a generous layer of my favorite BTGN Top Sealer. I placed a few rhinestones while it was drying.

I'm a bit embarassed about my lace design.... and how it is inconsistent. But I have to admit that I was so fed up with painting my nails when I finally got to the stage of painting the lace. The transfer on my right hand turned out a bit better in my opinion, so here's a rare picture of my right hand. The design looks better on the longer nails on my left hand, but you can tell that there's a newspaper transfer on my right.


I think in about a week I can finally take of the annoying gel on my left hand and cut them down. I can now see the broken edge from underneath. Yay. I'm still surprised that I didn't experience any liftings...

One more design and it's time for a few summery designs~ Still waiting for the summer to arrive here though... :(

Donnerstag, 28. Juni 2012

Spring Challenge 12: May Flowers!

There's three more designs of the Spring Challenge for me to post... one of them I'll show you today.

Design 12 was supposed to be "May Flower"-themed. I don't remember if the flowers I tried to recreate actually bloom in May, but I remember seeing them around in our garden this spring. I really wanted to do a manicure that uses the colors at least, but I decided to recreate the flowers themselves for this challenge. I hope you can tell what flowers they are supposed to be... :P


Despite my love for acrylic paints, I actually did this manicure with polishes only. The ones I used are:

- Manhattan Frozen Jogurt
- Illamasqua Load
- Color Club Almost Famous
- essence A Hint of Mint
- Catrice Virgin Forest mixed with A Hint of Mint
- Color Club Incognito
- Woo 665


Color Club Incognito is a light nude shade that looks really violet here. I was a bit surprised and had to check the bottle to make sure it really is Incognito. I think it made a surprinsigly well suited background for my flowers though.


Sadly, I didn't manage to take a solo shot of my thumb nail that wasn't blurry. In my opinion the flowers looked best on my thumb. But can you tell what flowers they are supposed to be? My colleagues mostly guessed the wrong flower... But to be fair the flowers they guessed also exist in this color pattern.

Two more to go... but well, it's all about finally posting them... ehem.
Have a nice day~

Sonntag, 24. Juni 2012

Spring Challenge 11: Eggs and Chicks

Sunday, finally. I was soooo looking forward to the weekend! I haven't worked the early shift in a while... I was just so tired when I got off work yesterday. It had a good thing too, though. I had a lot more time on hand to paint my nails, haha.

So today, I want to present my quite uninspired take on the 11th theme of the Spring Challenge, which is Eggs and Chicks. I didn't want to do some cracked eggs and chicks like the ones showing up every year around Easter. But I didn't really have another idea too. I had been thinking about changing the base color to one of the crazy shell colors to be found in my mother's garden. She keeps a few chicken and some of them lay eggs in really interesting colors, e.g. chocolate brown or light green.

But when the time came that I decided to sit down and finally do my Eggs and Chicks mani, I had a light yellow polish on my nails already and decided to go with a classic color scheme.


So my base is Rival de Loop 481, a light yellow creme. I don't have the best experiences with Rival de Loop polishes, so I don't own many. This is actually my third. They are quite inexpensive, but what use is the price if you don't fancy the concistency and/or brush. When I swatched it first, it looked quite opaque, but in the end... 3 to 4 coats on my nails. Boo.


Well, for my manicure, I ripped apart one of those kitchen sponges with the black scratchy side and used that scratchy part to sponge Illamasqua Load and Essie Marshmallow on to my "old" manicure. Aside from the polish, there was some residue from the sponge too, but I liked the effect.


Using black acrylic paint I painted my little chicks and flower pot. They were inspired by a font I stumbled upon the other day. The lady created a few other cute fonts... sadly no free ones, it seems.

What do you think? Did you take a look at the font? :D

Dienstag, 19. Juni 2012

Spring Challenge 10: Butterflies!

Here's another design for the Spring Challenge! Theme number 10 is butterflies and I had a few ideas for this one. In the end I settled for a rather simple look that still took me a while to accomplish. Haha.


I used two coats of p2 Pearly Lilac from the Color me softly LE as my base color and black acrylic paint as well as a detail brush for the butterflies. I thought about adding some rhinestones or glitter, but in the end... I felt that stuff like that might steal the show from my butterflies.


I don't know how often I removed some of those butterflies until I was ok with their look... This is what I love about acrylic paint! If you are fast enough you can just wipe it off with some wet tissue and repaint without damaging the polish underneath.

I didn't take any pictures, but I actually loved how my right hand turned out. It usually doesn't look as good, because I'm righthanded and my left is just not as steady as my right. But this time, I liked it a lot. I guess practice is showing slowly...


 And lastly, here's a shot of Pearly Lilac all on its own. It applies quite well, but it's a little sheer. Drying time is okay, but not really fast. I don't know why they called it pearly. I imagined something different when I first read the press releases. Pearly Lilac is a nice pastell violett with lots of silver flecks. It's nothing outstanding, but a nice polish for spring. I really don't like the shape of the bottle though...


What do you think? :D

Montag, 18. Juni 2012

Spring Challenge 9: Fresh Cut Lawns

Today, I want to present you my simple and quick take on the ninth installment of the Spring Challenge!

But before that, I would like to ask for your help! The other day, I posted my "glamorous" nail design I created for a small contest. This very contest has now entered the voting stage and I would be really really happy if you would take the time to vote for me. Just go to >>Rundum schön<< and you'll find a poll in the top right corner. You don't need to be a follower to vote! Thank you!

On to the nail art! Theme 9 for the Spring Challenge was Fresh Cut Lawns... and let me tell you, I hate fresh cut lawns. I don't know, they are just too clean looking for me. Too boring. I'm glad our garden has no lawn to be seen anymore. So here's my take on the theme:


I used OPI Greenwich Village, two unnamed Color Club polishes for the white and blue and essence Sundancer for the yellow dots. Another really simple mani that was still fun to do.


Please excuse the dryness of my hands. I don't know what's going on in the last few weeks, but my hands are so dry, it hurts. No cream seems to help and I'm also entering another phase of breaking nails. I only wore this mani for 2 days, because the nail of my middlefinger broke in a very bad spot. I managed to fix it, but as you may have noticed on my glamorous-post, I didn't really do a good job with the gel I used to stabilize it for the time being. Sadness.

What do you think? Do you like fresh cut lawns!?

Donnerstag, 14. Juni 2012

Spring Challenge 8: Matte Magic

Yes, I continued doing my challenge depite not being able to post. I hope I'll finish it within the next week, because I'd love to start another one. Those challenges are really fun. =)

So today I have one of those themes that really gave me a headache. I tried several combinations for this one, but none really appealed to me... Today, I want to show the two I liked the best.

after 1 day of wear

This polish is a franken I recently made myself, because I just can't find myself the perfect cornflower blue. It turned out a little bit too violet compared to a real cornflower, but I'll get there... I *need* the perfect cornflower blue. I mean, I'm looking for more than a year already.


I added those tiny silver pailettes and mattified the whole thing afterwards. I love mattified glitters... and silver plus purple is always a great combination in my opinion. My hand could have been a bit steadier while placing the glitters though.


I didn't wear this for long. Well, mattified manis just don't last very long on me, even though the polish itself was topcoated before I mattified it. But the real reason is the crazy amount of polishes I bought in the last few weeks that still want to be swatched and played with. Not that I got around to do that. Haha.

And then there was this manicure. I did it a few weeks before the purple one, around the time we had major bunny trouble.


This is Catrice Beam me Scotty! from the Out of Space LE. On it's own, it's drying to a suede like finish. I decided to mattify it nonetheless, because I found the effect of suede-and-glossy too subtil. To create this (still very subtil) manicure I applied two thin coats of Beam me Scotty! and topped it with essie Matte about you. When this was dry, I used tape to cover some matte stripes, then topcoated it using essence BTGN Top Sealer and immediately removed the tape. That's it. Nothing fancy.


Doing a glossy/matte-mani for this theme was my first idea when I read the challenge chart and I have tried several other combinations. I remember seeing some really awesome manis that sported this.. but mine didn't turn out that great. I'll try again some time.


This is Beam me Scotty! on it's own, not mattified. I like the finish, but I love the polish with top coat to make it glossy. If you use slightly thicker coats, this one is a one coater.

So what do you think of my matte attempts?

Dienstag, 15. Mai 2012

Spring Challenge 7: Glitter Tips

So I finally got around to write a new blog post... I don't know where time is running of to lately... I never would have guessed that taking care of six bunny babies would be this exhausting. We are doing it for about two and a half weeks now. Which means, two and a half weeks of planning every day around the bunny babies feeding schedule. I still got my job to do as well, so as much as I love doing nail art, I just couldn't find enough time. So today's manicure is actually from April 30. That's when I felt like spending time on nail art the last time...

And yet, it's not even real nail art, in my opinion. I just layered polishes. This kind of mani works well with the feedings, because I could just pause inbetween.

Anyway, I had a lot of ideas for this one and actually did another one before it. I'm going to show it at the bottom of this post. I'm just not really proud of it, haha. For some reason, thinking of "glitter tips" made me think about candy too, so I decided to do something pink and glittery. Also, I decided to take "tips" as my whole nails, not just the tips of my nails. It was just easier that way.

indirect daylight
shade
direct sunlight

The materials I used include
- essie Marshmallow, 2 coats
- Canmake 05, 1 coat
- essence Candy Kiss, 1 coat on half of each nails
- essence Space Queen, 1 coat on top of Candy Kiss
- BW Anc 591C, 2 coats on the tips only
- Kleancolor Aurora, 1 coat

I finally used Aurora... I had it on my desk for a while now and always wanted to use it, but I never did... I love the little stars in there. I just wish they were a bit more flat. If you enlarge the pictures, you can tell that they are bent... My beloved essence BTGN Top Sealer took care of that, but still, I think it would look even better. Also, I noticed that my favorite glitters tend to be Japanese polishes. I only used two for this mani, but I was pondering to use another Japanese one instead of Space Queen. I have been neglecting the latter though.

It was very sparcle-licious! I felt like sprung right out of a princess movie for little girls. The whole mani was incredibly thick on my tips and due to that reason, didn't last very long. It didn't chip or anything, but the tip wear was just very visible, if you know what I mean. You could even tell the layers apart. I found that funny though.

And finally, my first attempt on the glitter tips. I decided to re-do the theme because it's just not meant for spring. I loved the look, but the colors are too dark. I only wore it for a day. And those glitters were a pain to remove! The princess mani was nothing compared to this beast, even though there was twice the amount of glitters to remove.


For this one, I used p2 rich, mattified it and then applied the glitter, OPI Sparcle-licious, on the tips. I tried to do a drip mani here. I'm glad I took pictures right after finishing it. When it was completely dry, it looked only half as good!

Dienstag, 24. April 2012

Spring Challenge 6: Ombre

Today, I want to show you my take on the ombre manicure. I googled a bit and found out that ombre can mean a lot of things. Some are doing a skittle mani using polishes from a similar color range, others are doing gradient manis. I felt that a skittle mani was a bit boring, but I had already done a sponged gradient, so I was left with the same problem as before. I still decided to do a gradient. This time, I wanted to try it a different way though. I'm playing a bit with texture lately, so I tried to give the gradient a little texture by painting it instead of sponging.


I used about 5 different shades of blue to achieve this mani. I mixed them together to create a smooth gradient. I just painted small strokes in an alternating way. It almost looks like fish scales, I think. I got a few nice comments from co-workers on this one. My boss thought I had hurt my hand at first though, haha. It's simple, but I liked it. Am I doing too many blue/green manis lately? I just reached for the blues again... maybe I should have done a pink gradient instead.


I wore this for 2 days only, because by the end of day 2, I had quite extensive tipwear... It had already started after I applied topcoat, as you can see on the pictures. Oh well.

Since I haven't posted it in a while, here's the chart once again.


And the list of participants too~

Amanda from Mandy's Polish
Heidi from DIY Polish & More!
Katee from A Girl and Her Polish 
Charlotte from Charlotte's Nails
Tess from Football and Fingernails
Karine at Karinea0a
Victoria from Manicurator
Ashley from One Nail To Another
Dani from Rustic Comfort
Sue from Creative Nail Design by Sue
Amanda from Counting Down to Bliss
Hannah from Polished Prisms
Sarah from All This Polish
April from Munia's Nails
Sharra from The Blahg
Jess from Nearly Natural Nails


Samstag, 21. April 2012

Spring Challenge 5: A Rainbow after the Rain

...fail... lol

Hm, I was thinking about what to do for the rainbow theme and some polishes or techniques I hadn't used yet. I had done some gradient sponging already, so that was out. I didn't feel like painting rainbows either. Then I remembered the striping tape I bought a while ago... still unused. I had enough colors to do a rainbow, so I went with that.

First of all, I painted three layers of essie Marshmallow as my base. It took forever to dry as always. Then, I cut my striping tape and applied it. After cutting the edges, I applied 2 coats of essence BTGN Top Sealer to smooth everything out. It is pretty smooth actually. So far, so good. Since I did this late at night, I was quite tired and decided to go to sleep and take pictures the next morning. That was my mistake.

When I woke up, I had to find out that my topcoat had melted the colors of the striping tape, leaving silver tape with a hint of color around the edges. All that was left from the quite bold colors of the original rainbow was a pastel rainbow. For some reason, the topcoat had also heavily bubbled on top of the striping tape. :( The original colors were violet, dark blue, green, yellow, red...


I'll try again with some other top coat, but if it's happening again, I'll probably have the throw it away, or use if for tape manis only. Did anyone else experience something similar?

Here are the links to the other wonderful ladies participating in the Spring Challenge:

Amanda from Mandy's Polish
Heidi from DIY Polish & More!
Katee from A Girl and Her Polish 
Charlotte from Charlotte's Nails
Tess from Football and Fingernails
Karine at Karinea0a
Victoria from Manicurator
Ashley from One Nail To Another
Dani from Rustic Comfort
Sue from Creative Nail Design by Sue
Amanda from Counting Down to Bliss
Hannah from Polished Prisms
Sarah from All This Polish
April from Munia's Nails
Sharra from The Blahg
Jess from Nearly Natural Nails

Mittwoch, 18. April 2012

Spring Challenge 4: April Showers

Wow, the last few days were really tiring... I didn't get around to do anything. It's just horrible if half your colleagues are sick and you have to do their work too... But well, it's the same every year, so nothing we didn't expect. Last year around this time I wasn't doing my nails as frequently though. I managed to do my nails for theme 4 as planned, but I forgot to take pictures at first. Yet, this turned out to be a good thing!

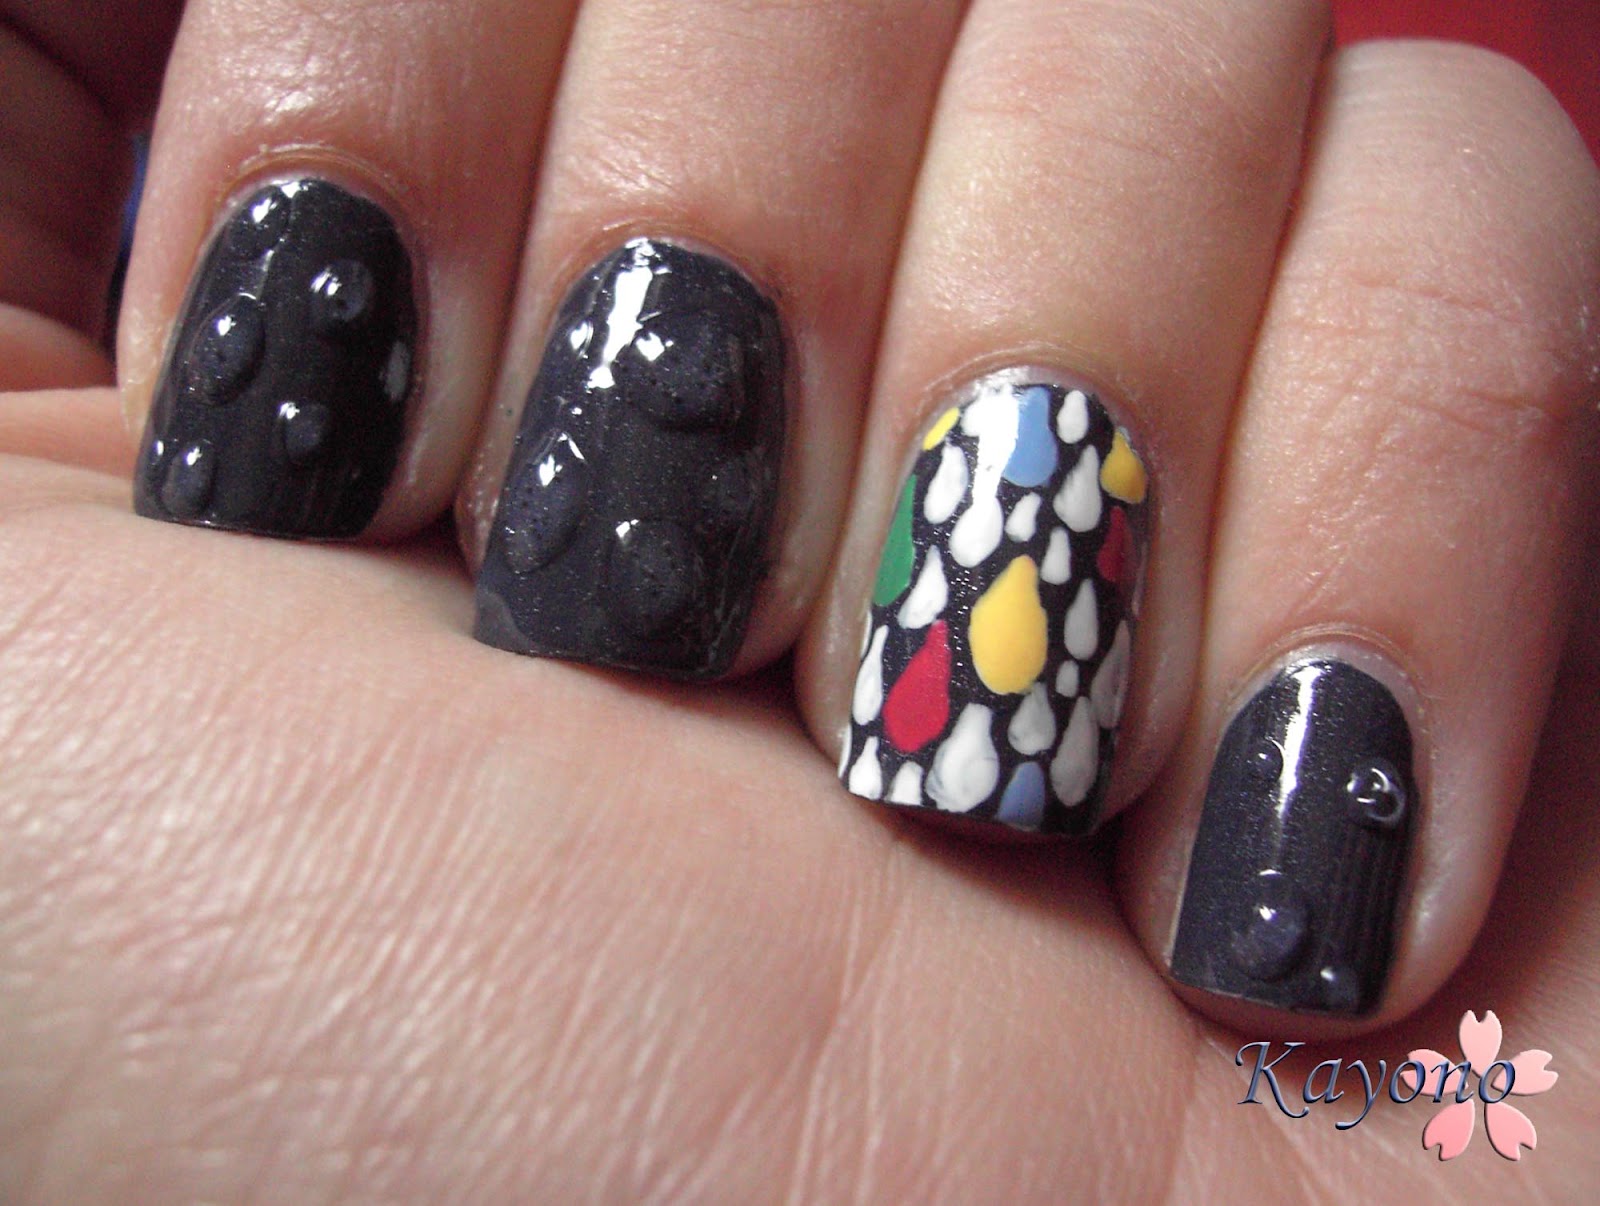
I didn't really have an idea for theme 4, April Showers, so I ended up looking at random pictures that turned up when searching for rain patterns. I'm sure a few have done the same and have seen the pattern I ended up using. I wanted to do something quick and easy and this pattern just did the job for me.

First of all, I removed my previous manicure just to find out, that the polish had stained my tips even though I had used a base cost. Boo. I cut them down a bit to minimize the damage. After applying two coats of base coat this time, I painted my nails using two coats of essence Into the Dark, which is a polish from the fall LE called Vampire Love. So far, I hadn't used it. In the bottle it's a greyish dark blue with some shimmer which reminded me of rain clouds, hence my choice to use it. It doesn't translate like that to the nail though. It's darker and the shimmer is not as prominent. Still a nice color though... more of thunderstorm clouds maybe.

On my ring finger nail, I painted the pattern using white acrylic paint. The white also makes the colored drops pop a lot more. Here's the end result:


The next day, when I was showering, I was looking at my hands and had another idea. I thought, why not try to make the dark nails look like they were just hit by some rain. Using clear polish, I tried to imitate this. What do you think?


No spring-like manicure, but I like the rain effect. I didn't go to work leaving it like this though. After taking pictures, I added top coat which smoothed out my little raindrops somewhat. It was an interesting effect, almost 3D. I might have to try this again... doing it on purpose next time.

And again, here are the links to the other wonderful ladies participating in the Spring Challenge:

Amanda from Mandy's Polish
Heidi from DIY Polish & More!
Katee from A Girl and Her Polish 
Charlotte from Charlotte's Nails
Tess from Football and Fingernails
Karine at Karinea0a
Victoria from Manicurator
Ashley from One Nail To Another
Dani from Rustic Comfort
Sue from Creative Nail Design by Sue
Amanda from Counting Down to Bliss
Hannah from Polished Prisms
Sarah from All This Polish
April from Munia's Nails
Sharra from The Blahg
Jess from Nearly Natural Nails

Donnerstag, 12. April 2012

Spring Challenge 3: Glitter Sammy

Theme Nr. 3 of our Spring Themed Manicure Challenge is creating a glitter sandwich. I haven't done one in a while, so I was really looking forward to this theme. I just didn't think I'd do Theme 3 so fast. But... I didn't like my ladybugs so much, so here is my glitter sammy...

I really love blue glitter sandwiches... but since I have done one before and I knew that Hannah would also do a blue sammy, I thought about what to do about that. When I do a blue glitter sandwich, I always have to think of a starry night sky. So to me it was obvious to think about a variation of that theme.

What I came up with might not even be a real glitter sandwich, but it was fun to try and I love how it turned out.


I tried to do a very early sunrise mani here. So first I sponged my sunrise using a yellow polish that I watered down using some clear polish, a light turquoise and my two favorite blue jellys. This turned out okay, but I had to sponge twice. Otherwise, the colors would be too light. On top, I applied a generous layer of a silver holo glitter polish from Japan. Man, that one got really thick over the years. I really need to finish that bottle soon! On top of the layer of glitter polish, I applied a coat of a light blue jelly that I mixed myself using clear polish and a baby blue. My "sunrise" became a little foggy that way, but fog is something we have here a lot lately around sunrise.


The placement of the glitter could have been better on pinky and pointer, but all in all, I'm quite satisfied with my glitter sammy. Can you see the belt of Orion!? xD


What do you think? Does this still qualify as a glitter sammy? The jelly polishes loose some of their "squishy" jelly qualities when spongend, so it doesn't have as much depth as before...


The next theme is going to be April Showers. Hm... need some inspiration here. Since I like my current mani quite a lot, I'll have a few days to think about it~

Please take a look at the other girls' manis. Here's a list of who has completed Theme 3 so far:

Amanda from Mandy's Polish
Heidi from DIY Polish & More!
Katee from A Girl and Her Polish 
Charlotte from Charlotte's Nails
Tess from Football and Fingernails
Karine at Karinea0a
Victoria from Manicurator
Ashley from One Nail To Another
Dani from Rustic Comfort
Sue from Creative Nail Design by Sue
Amanda from Counting Down to Bliss
Hannah from Polished Prisms
Sarah from All This Polish
April from Munia's Nails
Sharra from The Blahg
Jess from Nearly Natural Nails

Mittwoch, 11. April 2012

Spring Challenge 2: Ladybugs

Here's my take on the second theme, ladybugs. A few of the other ladies had already finished theirs while I was still pondering on what to do. Well, one of them had done bugs on a leaf which became my inspiration of sorts.

I don't like how my bugs in the green grass turned out though. I imagined the whole thing a lot brighter... meh. This is also the reason why there is only one picture...


The little bugs kind of look like spiders... :( Red spiders. I like the antenna of the big ones though.

I used OPI Bubble Bath to even out my discolored nails first and then used Catrice I Sea You! and Sold Out For Ever as well as Rival de Loop  #01 Spring Melody to create the green parts of this mani. The bugs are painted using acrylics for the black and an unnamed red polish. That's it.


And here are the links to some of the other ladybug manicures ;)

Amanda from Mandy's Polish
Heidi from DIY Polish & More!
Charlotte from Charlotte's Nails
Ashley from One Nail to Another
Sue from Creative Nail Design by Suen
Karine from Karinea0a
Victoria from Manicurator
and of course Hannah from Polished Prisms

Sonntag, 8. April 2012

Spring Challenge 1: Spring Pastels

Happy Easter everyone! I hope you have a great weekend! It's nice and sunny here, but so cold... so we ended up not doing our annual Easter stroll. xD

Since I finished my first challenge, the Girly Girl Nail Art Challenge, I was keeping my eyes open for another challenge that sounds fun and is flexible timewise. The other day I stumbled upon a challenge hosted by Hannah from Polished Prisms called "April Showers Bring May Flowers. A Spring themed Manicure Challenge". It contains a total of 14 different themes without a set timeframe, which made it very appealing to me. Here's a chart of the themes:


Sounds fun, I think. I'm going to try this challenge from today on! I think I'm going to try to do 2-3 of the themes each week. I'll probably settle with Thursdays and Sundays as these are usually my days off. If I'm in the mood and have enough time, I'll try to do a third inbetween these days. Which means that this challenge will keep me busy for a minimum of 4 weeks. Sounds do-able.

So first theme is spring pastels. This is kind of convenient, because Easter is always a pastel colored holiday for me. I used to paint eggs in all kinds of pastel colors and patterns. I usually even wear a lot of pastel colored clothes around this time of the year. I used quite a few pastel nail polishes lately, even though I haven't posted most of those manicures yet. One color has been missing though, which is pastel pink. Last friday night (...xD) I decided that I would do a quick Easter themed manicure to calm down my nerves. I was really nervous because I was writing a job application... I don't know it always wrecks me...

Here's my quick and easy Easter manicure. Nothing special, but I like it.


I used two coats of a pastel pink polish by Jade, that I got from my mom a few weeks ago. It is kind of old and a little goopy. I like the color though. On my ring finger and thumb I used three coats of essie Marshmallow. I hadn't used this in a while, but I think it's actually a little bit too milky white for what I intended to do. The white is acrylic paint, the eggs, grass and odd flowers were painted using various Catrice polishes.

I like how the bunny turned out. It's a little on the heavy side... (We actually had bunny for lunch today...)


My camera had a hard time with this manicure. Not enough contrast, I guess.

Next theme for this challenge are ladybugs... I don't really have an idea yet...

The list of participants for this challenge is still growing. I think it's convenient to have it under the blog posts. Please take a look at the other participants manicures! Thank you~

Amanda from Mandy's Polish
Heidi from DIY Polish & More!
Katee from A Girl and Her Polish 
Charlotte from Charlotte's Nails
Tess from Football and Fingernails
Karine at Karinea0a
Victoria from Manicurator
Ashley from One Nail To Another
Dani from Rustic Comfort
Sue from Creative Nail Design by Sue
Jess from Nearly Natural Nails
and of course Hannah herself from Polished Prims

Have a nice day!
Related Posts Plugin for WordPress, Blogger...